1.1数据类型
2.1Bool
3.1声明
声明布尔值的语法如下:([]之间的所有内容都是可选的)
| 语法 | 描述 | 返回类型 |
|---|---|---|
| Bool() | 创建Bool值 | Bool |
| True | 创建一个分配有 true 值的 Bool对象 |
Bool |
| False | 创建一个Bool值并赋值为 false |
Bool |
| Bool(value: Boolean) | 创建一个 Bool,并分配一个 Scala 布尔类型(true、false)的值。这显式地转换为 True 或 False 。 |
Bool |
val myBool_1 = Bool()        // Create a Bool
myBool_1 := False            // := is the assignment operator (like verilog <=)

val myBool_2 = False         // Equivalent to the code above

val myBool_3 = Bool(5 > 12)  // Use a Scala Boolean to create a Bool
3.2运算符
以下运算符可用于 Bool 类型:
4.1逻辑运算
| 运算符 | 描述 | 返回类型 |
|---|---|---|
| !x | 逻辑非 | Bool |
| x && y x & y |
逻辑与 | Bool |
| x | y x | y |
逻辑或 | Bool |
| x ^ y | 逻辑异或 | Bool |
| ~x | 逻辑非 | Bool |
| x.set[()] | 将 x 设置为 True | Unit (none) |
| x.clear[()] | 将 x 设置为 False | Unit (none) |
| x.setWhen(cond) | 当 cond 为 True 时设置 x 为 True | Bool |
| x.clearWhen(cond) | 当 cond 为 True 时设置 x 为 False | Bool |
| x.riseWhen(cond) | 当 x 为 False 并且 cond 为 True 时设置 x 为 True | Bool |
| x.fallWhen(cond) | 当 x 为 True 并且 cond 为 True 时设置 x 为False | Bool |
 val a, b, c = Bool()
 val res = (!a & b) ^ c   // ((NOT a) AND b) XOR c

 val d = False
 when(cond) {
   d.set()                // equivalent to d := True
 }

 val e = False
 e.setWhen(cond)          // equivalent to when(cond) { d := True }

 val f = RegInit(False) fallWhen(ack) setWhen(req)
 /** equivalent to
  * when(f && ack) { f := False }
  * when(req) { f := True }
  * or
  * f := req || (f && !ack)
  */

// mind the order of assignments!  last one wins
val g = RegInit(False) setWhen(req) fallWhen(ack)
// equivalent to g := ((!g) && req) || (g && !ack)
4.2边缘检测
所有边缘检测函数都将通过 RegNext 实例化一个附加寄存器,以获取相关 Bool 的延迟值(一拍)。
This feature does not reconfigure a D-type flip-flop to use an alternative CLK source, it uses two D-type flip-flop in series chain (with both CLK pins inheriting the default ClockDomain). It has combinational logic to perform edge detection based on the output Q states.
| 运算符 | 描述 | 返回类型 |
|---|---|---|
| x.edge[()] | 当 x 状态改变时返回 True | Bool |
| x.edge(initAt: Bool) | 与 x.edge 相同但具有重置后的初始值 | Bool |
| x.rise[()] | 当 x 在上一个周期为低电平且现在为高电平时返回 True | Bool |
| x.rise(initAt: Bool) | 与 x.rise 相同但具有重置后的初始值 | Bool |
| x.fall[()] | 当 x 在上一个周期为高且现在为低时返回 True | Bool |
| x.fall(initAt: Bool) | 与 x.fall 相同但具有重置后的初始值 | Bool |
| x.edges[()] | 返回捆绑包(上升、下降、切换) | BoolEdges |
| x.edges(initAt: Bool) | 与 x.edges 相同但具有重置后的初始值 | BoolEdges |
| x.toggle[()] | 在每个边缘返回 True | Bool |
when(myBool_1.rise(False)) {
    // do something when a rising edge is detected
}

val edgeBundle = myBool_2.edges(False)
when(edgeBundle.rise) {
    // do something when a rising edge is detected
}
when(edgeBundle.fall) {
    // do something when a falling edge is detected
}
when(edgeBundle.toggle) {
    // do something at each edge
}
4.3比较运算
| 运算符 | 描述 | 返回类型 |
|---|---|---|
| x === y | 等价性判断 | Bool |
| x =/= y | 不等价判断运算 | Bool |
when(myBool) { // Equivalent to when(myBool === True)
    // do something when myBool is True
}

when(!myBool) { // Equivalent to when(myBool === False)
    // do something when myBool is False
}
4.4类型转换
| 运算符 | 描述 | 返回类型 |
|---|---|---|
| x.asBits | 二进制转换为 Bits | Bits(1 bit) |
| x.asUInt | 二进制转换为 UInt | UInt(1 bit) |
| x.asSInt | 二进制转换为SInt | SInt(1 bit) |
| x.asUInt(bitCount) | 二进制转换为 UInt 并调整大小,将 Bool 值放入 LSB 并用零填充。 | UInt(bitCount bits) |
| x.asBits(bitCount) | 二进制转换为位并调整大小,将布尔值放入 LSB 并用零填充。 | Bits(bitCount bits) |
// Add the carry to an SInt value
val carry = Bool()
val res = mySInt + carry.asSInt
4.5杂项
| 运算符 | 描述 | 返回类型 |
|---|---|---|
| x ## y | 连接Bits,x->高位,y->低位 | Bits(w(x) + w(y) bits) |
| x #* n | n次重复x并合并 | Bits(n bits) |
val a, b, c = Bool()

// Concatenation of three Bool into a single Bits(3 bits) type
val myBits = a ## b ## c
4.6掩码布尔值
具有掩码的布尔型允许任意值(don’t care)。它们通常不单独使用,而是通过 MaskedLiteral 使用。
// first argument: Scala Boolean value
// second argument: do we care ? expressed as a Scala Boolean
val masked = new MaskedBoolean(true, false)
2.2位Bits
Bits 类型表示多位向量,不传达任何算术含义。
3.1声明
声明位向量的语法如下([]之间的所有内容都是可选的):
| 语法 | 描述 |
|---|---|
| Bits [()] | 创建Bits,其位数是从构造后最宽的赋值语句推断出来的 |
| Bits(x bits) | 创建具有 x 位的Bits |
| B(value: Int[, x bits])
B(value: BigInt[, x bits]) |
创建 x 位Bits,且赋值为’value’ |
| B”[[size’]base]value” | 创建Bits并赋值为’value’(基数:“h”、“d”、“o”、“b”) |
| B([x bits,] elements: Element*) | 创建并赋值由 elements 指定值的Bits |
val myBits1 = Bits(32 bits)
val myBits2 = B(25, 8 bits)
val myBits3 = B"8'xFF"   // Base could be x,h (base 16)
                         //               d   (base 10)
                         //               o   (base 8)
                         //               b   (base 2)
val myBits4 = B"1001_0011"  // _ can be used for readability

// Bits with all ones ("11111111")
val myBits5 = B(8 bits, default -> True)

// initialize with "10111000" through a few elements
val myBits6 = B(8 bits, (7 downto 5) -> B"101", 4 -> true, 3 -> True, default -> false)

// "10000000" (For assignment purposes, you can omit the B)
val myBits7 = Bits(8 bits)
myBits7 := (7 -> true, default -> false)
当推断 Bits 的宽度时,赋予值的宽度仍然必须与信号的最终宽度相匹配
// Declaration
val myBits = Bits()     // the size is inferred from the widest assignment
// ....
// .resized needed to prevent WIDTH MISMATCH error as the constants
// width does not match size that is inferred from assignment below
myBits := B("1010").resized  // auto-widen Bits(4 bits) to Bits(6 bits)
when(condxMaybe) {
  // Bits(6 bits) is inferred for myBits, this is the widest assignment
  myBits := B("110000")
}
3.3运算符
以下运算符可用于 Bits 类型:
4.1逻辑运算
| 运算符 | 描述 | 返回类型 |
|---|---|---|
| ~x | 按位非 | Bits(w(x) bits) |
| x & y | 按位与 | Bits(w(xy) bits) |
| x | y | 按位或 | Bits(w(xy) bits) |
| x ^ y | 按位异或 | Bits(w(xy) bits) |
| x.xorR | 对 x 的所有位进行异或 | Bool |
| x.orR | 对x 的所有位做或运算 | Bool |
| x.andR | 对x 的所有位做与运算 | Bool |
| y = 1 // 整数 x >> y |
逻辑右移,y: Int 结果的宽度可能会变少 |
Bits(w(x) - y bits) |
| y = U(1) // UInt x >> y |
逻辑右移,y: UInt 结果宽度相同 |
Bits(w(x) bits) |
| y = 1 // 整数 x << y |
逻辑左移,y: Int 结果的宽度可能会增加 |
Bits(w(x) + y bits) |
| y = U(1) // UInt x << y |
逻辑左移,y: UInt 结果的宽度可能会增加 |
Bits(w(x) + max(y) bits) |
| x |>> y | 逻辑右移,y: Int/UInt 结果宽度相同 |
Bits(w(x) bits) |
| x |<< y | 逻辑左移,y: Int/UInt 结果宽度相同 |
Bits(w(x) bits) |
| x.rotateLeft(y) | 逻辑循环左移,y: UInt/Int 结果宽度相同 |
Bits(w(x) bits) |
| x.rotateRight(y) | 逻辑循环右移,y:UInt/Int 结果宽度相同 |
Bits(w(x) bits) |
| x.clearAll[()] | 清零所有位 | 修改x |
| x.setAll[()] | 将所有的位设置为1 | 修改x |
| x.setAllTo(value: Boolean) | 将所有位设置为给定的布尔值(Scala Boolean) | 修改x |
| x.setAllTo(value: Bool) | 将所有位设置为给定的布尔值(Spinal Bool) | 修改x |
// Bitwise operator
val a, b, c = Bits(32 bits)
c := ~(a & b) // Inverse(a AND b)

val all_1 = a.andR // Check that all bits are equal to 1

// Logical shift
val bits_10bits = bits_8bits << 2  // shift left (results in 10 bits)
val shift_8bits = bits_8bits |<< 2 // shift left (results in 8 bits)

// Logical rotation
val myBits = bits_8bits.rotateLeft(3) // left bit rotation

// Set/clear
val a = B"8'x42"
when(cond) {
  a.setAll() // set all bits to True when cond is True
}
4.2比较运算
| 运算符 | 描述 | 返回类型 |
|---|---|---|
| x === y | 等价性判断 | Bool |
| x =/= y | 不等价判断运算 | Bool |
when(myBits === 3) {
  // ...
}

val notMySpecialValue = myBits_32 =/= B"32'x44332211"
4.3类型转换
| 运算符 | 描述 | 返回类型 |
|---|---|---|
| x.asBits | 二进制转换为 Bits | Bits(w(x) bits) |
| x.asUInt | 二进制转换为 UInt | UInt(w(x) bits) |
| x.asSInt | 二进制转换为SInt | SInt(w(x) bits) |
| x.asBools | 转换为一个布尔数组 | Vec(Bool(), w(x)) |
| x.asBool | 提取 x 的 LSB |
Bool(x.lsb) |
| B(x: T) | 将数据转换为 Bits |
Bits(w(x) bits) |
要将 Bool 、 UInt 或 SInt 转换为 Bits,您可以使用 B(something) 或 B(something[, x bits]):
// cast a Bits to SInt
val mySInt = myBits.asSInt

// create a Vector of bool
val myVec = myBits.asBools

// Cast a SInt to Bits
val myBits = B(mySInt)

// Cast the same SInt to Bits but resize to 3 bits
//  (will expand/truncate as necessary, retaining LSB)
val myBits = B(mySInt, 3 bits)
4.4位提取
所有位提取操作均可用于读取一个位/一组位。与其他 HDL 一样,提取运算符也可用于为 Bits 的一部分赋值。
所有位提取操作均可用于读取一个位/一组位。与其他 HDL 一样,它们也可用于选择要写入位的范围。
| 运算符 | 描述 | 返回类型 |
|---|---|---|
| x(y: Int) | 静态访问第 y 位 | Bool |
| x(y: UInt) | 访问第 y 位,这里y为可变的信号 | Bool |
| x(offset: Int, width bits) | 固定地选择偏移量和宽度,offset 为选择信号中LSB的索引 |
Bits(width bits) |
| x(offset: UInt, width bits) | 选择偏移量可变和宽度固定的信号,offset 为选择信号中LSB的索引 (可为另一信号) |
Bits(width bits) |
| x(range: Range) | 访问Bits的 范围 。例如:myBits(4 downto 2) | Bits(range.size bits) |
| x.subdivideIn(y slices, [strict: Boolean]) | 将x分割为y片,y: Int | Vec(Bits(…), y) |
| x.subdivideIn(y bits, [strict: Boolean]) | 将 x 分割为 y 位的多个切片,y: Int | Vec(Bits(y bit), …) |
| x.msb | 访问 x 的最高有效位(最高索引) | Bool |
| x.lsb | 访问 x 的最低有效位(索引 0) | Bool |
一些基本示例:
// get the element at the index 4
val myBool = myBits(4)
// assign element 1
myBits(1) := True

// index dynamically
val index = UInt(2 bit)
val indexed = myBits(index, 2 bit)

// range index
val myBits_8bit = myBits_16bit(7 downto 0)
val myBits_7bit = myBits_16bit(0 to 6)
val myBits_6bit = myBits_16bit(0 until 6)
// assign to myBits_16bit(3 downto 0)
myBits_8bit(3 downto 0) := myBits_4bit

// equivalent slices, no reversing occurs
val a = myBits_16bit(8 downto 4)
val b = myBits_16bit(4 to 8)

// read / assign the msb / leftmost bit / x.high bit
val isNegative = myBits_16bit.msb
myBits_16bit.msb := False
4.5分割细节
两个 subdivideIn 函数的所有参数都有一个可选参数 strict 参数(即 subdivideIn(slices: SlicesCount, strict: Boolean = true) )。如果 strict 为 true,则如果输入无法等分,将引发错误。如果设置为 false,最后一个元素可能比其他(大小相等)元素小。
// Subdivide
val sel = UInt(2 bits)
val myBitsWord = myBits_128bits.subdivideIn(32 bits)(sel)
    // sel = 3 => myBitsWord = myBits_128bits(127 downto 96)
    // sel = 2 => myBitsWord = myBits_128bits( 95 downto 64)
    // sel = 1 => myBitsWord = myBits_128bits( 63 downto 32)
    // sel = 0 => myBitsWord = myBits_128bits( 31 downto  0)

 // If you want to access in reverse order you can do:
 val myVector   = myBits_128bits.subdivideIn(32 bits).reverse
 val myRevBitsWord = myVector(sel)

 // We cean also assign through subdivides
 val output8 = Bits(8 bit)
 val pieces = output8.subdivideIn(2 slices)
 // assign to output8
 pieces(0) := 0xf
 pieces(1) := 0x5
4.6杂项
与上面列出的位提取操作相反,上述函数不能使用其返回值给原始信号赋值。
| 运算符 | 描述 | 返回类型 |
|---|---|---|
| x.getWidth | 返回位数 | Int |
| x.bitsRange | 返回范围(0 到 x.high) | 范围 |
| x.valueRange | 返回最小到最大 x 值的范围,理解为无符号整数(0 到 2 ** width - 1)。 | 范围 |
| x.high | 返回 MSB(最高有效位) 的索引(x的最高索引,该索引从0开始计数) | Int |
| x.reversed | 返回 x 的副本,其位顺序相反,MSB<>LSB 是镜像的。 | Bits(w(x) bits) |
| x ## y | 连接Bits,x->高位,y->低位 | Bits(w(x) + w(y) bits) |
| x #* n | n次重复x并合并 | Bits(w(x) * n bits) |
| x.resize(y) | 返回一个新的信号与 x 信号直接连接但位宽变成了y位。如果位宽变大了,则根据需要在 MSB 处用零填充进行扩展,y: Int | Bits(y bits) |
| x.resized | 返回一个允许自动调整位宽的 x 的副本信号。调整位宽操作被推迟到稍后的赋值操作。调整位宽可能会加宽或截断原信号,但保留 LSB。 | Bits(w(x) bits) |
| x.resizeLeft(x) | 调整位宽时保持 MSB 位置不变,x:Int 调整位宽可能会加宽或截断信号,同时保留 MSB。 | Bits(x bits) |
| x.getZero | 返回新的 Bits 的实例,该实例被分配了与 x 宽度相同的0值(常量)。 | Bits(0, w(x) bits) |
| x.getAllTrue | 返回 Bits 的新实例,该实例被赋予了与 x 宽度相同的1值(常量)。 | Bits(w(x) bits).setAll() |
备注
validRange 只能用于最小值和最大值能够保存在32 位有符号整数的情况下。 (这是由于 Scala scala.collection.immutable.Range 类型使用 Int 作为范围描述)
println(myBits_32bits.getWidth) // 32

// Concatenation
myBits_24bits := bits_8bits_1 ## bits_8bits_2 ## bits_8bits_3
// or
myBits_24bits := Cat(bits_8bits_1, bits_8bits_2, bits_8bits_3)

// Resize
myBits_32bits := B"32'x112233344"
myBits_8bits  := myBits_32bits.resized       // automatic resize (myBits_8bits = 0x44)
myBits_8bits  := myBits_32bits.resize(8)     // resize to 8 bits (myBits_8bits = 0x44)
myBits_8bits  := myBits_32bits.resizeLeft(8) // resize to 8 bits (myBits_8bits = 0x11)
4.7掩码字面量
MaskedLiteral 值带有”不关心”值的位向量,其中”不关心”值用 - 表示。它们可用于直接比较或用于 switch 和 mux 等语句。
val myBits = B"1101"

val test1 = myBits === M"1-01" // True
val test2 = myBits === M"0---" // False
val test3 = myBits === M"1--1" // True
2.3 UInt/SInt
UInt/SInt 类型用于表达二进制补码无符号/有符号整数的位向量。他们可以做 Bits 相同的事情,但具有无符号/有符号整数算术和比较。
3.1声明
以下是声明一个整数的语法:([] 中的内容是可选的)
| 语法 | 描述 |
|---|---|
| UInt[()] SInt[()] |
创建一个无符号/有符号整数,自动推断位数 |
| UInt(x bits) SInt(x bits) |
创建一个 x 位的无符号/有符号整数 |
| U(value: Int[,x bits]) U(value: BigInt[,x bits]) S(value: Int[,x bits]) S(value: BigInt[,x bits]) |
创建一个无符号/有符号整数,并将其分配给 ‘value’ |
| U”[[size’]base]value” S”[[size’]base]value” |
创建一个无符号/有符号整数,并将其分配给 ‘value’ (base: ‘h’, ‘d’, ‘o’, ‘b’) |
| U([x bits,] elements: Element) S([x bits,] elements: Element) |
创建一个无符号整数,并为其赋值一个由 elements 指定的值 |
val myUInt = UInt(8 bit)
myUInt := U(2, 8 bit)
myUInt := U(2)
myUInt := U"0000_0101"  // Base per default is binary => 5
myUInt := U"h1A"        // Base could be x (base 16)
                        //               h (base 16)
                        //               d (base 10)
                        //               o (base 8)
                        //               b (base 2)
myUInt := U"8'h1A"
myUInt := 2             // You can use a Scala Int as a literal value

val myBool = Bool()
myBool := myUInt === U(7 -> true, (6 downto 0) -> false)
myBool := myUInt === U(8 bit, 7 -> true, default -> false)
myBool := myUInt === U(myUInt.range -> true)

// For assignment purposes, you can omit the U/S
// which also allows the use of "default -> ???"
myUInt := (default -> true)                        // Assign myUInt with "11111111"
myUInt := (myUInt.range -> true)                   // Assign myUInt with "11111111"
myUInt := (7 -> true, default -> false)            // Assign myUInt with "10000000"
myUInt := ((4 downto 1) -> true, default -> false) // Assign myUInt with "00011110"
3.2运算符
以下运算符可用于 UInt 和 SInt 类型:
4.1逻辑运算
| 运算符 | 描述 | 返回类型 |
|---|---|---|
| ~x | 按位非 | T(w(x) bits) |
| x & y | 按位与 | T(max(w(x), w(y)) bits) |
| x | y | 按位或 | T(max(w(x), w(y)) bits) |
| x ^ y | 按位异或 | T(max(w(x), w(y)) bits) |
| x.xorR | 对 x 的所有位进行异或(缩减运算符) | Bool |
| x.orR | 对x 的所有位进行或操作(缩减运算符) | Bool |
| x.andR | 对 x 的所有位进行与操作(缩减运算符) | Bool |
| x >> y | 算术右移,y : Int | T(w(x) - y bits) |
| x >> y | 算术右移,y : UInt | T(w(x) bits) |
| x << y | 算术左移,y : Int | T(w(x) + y bits) |
| x << y | 算术左移,y : UInt | T(w(x) + max(y) bits) |
| x |>> y | 逻辑右移,y : Int/UInt | T(w(x) bits) |
| x |<< y | 逻辑左移,y : Int/UInt | T(w(x) bits) |
| x.rotateLeft(y) | 逻辑循环左移,y : UInt/Int y 的宽度被限制为 log2Up(x) 的宽度或更小 |
T(w(x) bits) |
| x.rotateRight(y) | 逻辑循环右移,y : UInt/Int y 的宽度被限制为 log2Up(x) 的宽度或更小 |
T(w(x) bits) |
| x.clearAll[()] | 清零所有位 | 修改x |
| x.setAll[()] | 将所有的位设置为1 | 修改x |
| x.setAllTo(value : Boolean) | 将所有位设置为给定的布尔值(Scala Boolean) | 修改x |
| x.setAllTo(value : Bool) | 将所有位设置为给定的布尔值(Spinal Bool) | 修改x |
备注
Notice the difference in behavior between x >> 2 (result 2 bit narrower than x) and x >> U(2) (keeping width) due to the Scala type of y.
在第一种情况下,“2”是一个 Int 的值(可以看作是“实例细化整数常量”),在第二种情况下,它是一个硬件信号( UInt 类型)这也可能不是一个常数。
val a, b, c = SInt(32 bits)
a := S(5)
b := S(10)

// Bitwise operators
c := ~(a & b)     // Inverse(a AND b)
assert(c.getWidth == 32)

// Shift
val arithShift = UInt(8 bits) << 2      // shift left (resulting in 10 bits)
val logicShift = UInt(8 bits) |<< 2     // shift left (resulting in 8 bits)
assert(arithShift.getWidth == 10)
assert(logicShift.getWidth == 8)

// Rotation
val rotated = UInt(8 bits) rotateLeft 3 // left bit rotation
assert(rotated.getWidth == 8)

// Set all bits of b to True when all bits of a are True
when(a.andR) { b.setAll() }
4.2算术运算
| 运算符 | 描述 | 返回类型 |
|---|---|---|
| x + y | 加法 | T(max(w(x), w(y)) bits) |
| x +^ y | 带进位的加法 | T(max(w(x), w(y)) + 1 bits) |
| x +| y | 添加带有饱和( saturation)的加数(另请参见 T.maxValue 和 T.minValue) | T(max(w(x), w(y)) bits) |
| x - y | 减法 | T(max(w(x), w(y)) bits) |
| x -^ y | 带进位的减法 | T(max(w(x), w(y)) + 1 bits) |
| x -| y | 带饱和( saturation)的减法(另请参见 T.minValue 和 T.maxValue) | T(max(w(x), w(y)) bits) |
| x * y | 乘法 | T(w(x) + w(y)) bits) |
| x / y | 除法 | T(w(x) bits) |
| x % y | 求模运算 | T(min(w(x), w(y)) bits) |
| ~x | 一元补码运算,按位非(NOT) | T(w(x) bits) |
| -x | SInt 类型的一元二进制补码。不适用于 UInt。 | SInt(w(x) bits) |
val a, b, c = UInt(8 bits)
a := U"xf0"
b := U"x0f"

c := a + b
assert(c === U"8'xff")

val d = a +^ b
assert(d === U"9'x0ff")

// 0xf0 + 0x20 would overflow, the result therefore saturates
val e = a +| U"8'x20"
assert(e === U"8'xff")
备注
请注意此处如何进行仿真时判断(使用 ===),而不是前面示例中的细化时判断(使用 ==)。
4.3比较运算
| 运算符 | 描述 | 返回类型 |
|---|---|---|
| x === y | 等价性判断 | Bool |
| x =/= y | 不等价判断运算 | Bool |
| x > y | 大于 | Bool |
| x >= y | 大于或等于 | Bool |
| x < y | 小于 | Bool |
| x <= y | 小于或等于 | Bool |
val a = U(5, 8 bits)
val b = U(10, 8 bits)
val c = UInt(2 bits)

when (a > b) {
  c := U"10"
} elsewhen (a =/= b) {
  c := U"01"
} elsewhen (a === U(0)) {
  c.setAll()
} otherwise {
  c.clearAll()
}
备注
当比较 UInt 值时,允许 “环绕” 行为,即当值超过最大值时,它们将”环绕” 到最小值。在这种情况下,可以使用 UInt 的 wrap 方法。对于 UInt 变量 x、y,如果 x.wrap < y,则如果 x 在环绕意义上小于 y,结果为真。
4.4类型转换
| 运算符 | 描述 | 返回类型 |
|---|---|---|
| x.asBits | 二进制转换为 Bits | Bits(w(x) bits) |
| x.asUInt | 二进制转换为 UInt | UInt(w(x) bits) |
| x.asSInt | 二进制转换为SInt | SInt(w(x) bits) |
| x.asBools | 转换为 Bool 数组 | Vec(Bool(), w(x)) |
| x.asBool | 提取 x 的 LSB |
Bool(x.lsb) |
| S(x: T) | 将数据转换为 SInt | SInt(w(x) bits) |
| U(x: T) | 将数据转换为 UInt | UInt(w(x) bits) |
| x.intoSInt | 转换为 SInt,扩展符号位 | SInt(w(x) + 1 bits) |
| myUInt.twoComplement(en: Bool) | 如果 en 为真,则生成二进制补码的数值,否则不变。(en 使结果为负数) |
SInt(w(myUInt) + 1, bits) |
| mySInt.abs | 以 UInt 值形式返回绝对值 | UInt(w(mySInt) bits) |
| mySInt.abs(en: Bool) | 当 en 为真时,返回UInt类型的绝对值,否则,只需将位解释为无符号数。 |
UInt(w(mySInt) bits) |
| mySInt.absWithSym | 返回对称的 UInt 值的绝对值,缩小 1 位 | UInt(w(mySInt) - 1 bits) |
要将一个 Bool、一个 Bits 或一个 SInt 转换为一个 UInt,可以使用 U(something)。要将东西转换为一个 SInt,可以使用 S(something)。
// Cast an SInt to Bits
val myBits = mySInt.asBits

// Create a Vector of Bool
val myVec = myUInt.asBools

// Cast a Bits to SInt
val mySInt = S(myBits)

// UInt to SInt conversion
val UInt_30 = U(30, 8 bit)

val SInt_30 = UInt_30.intoSInt
assert(SInt_30 === S(30, 9 bit))

mySInt := UInt_30.twoComplement(booleanDoInvert)
    // if booleanDoInvert is True then we get S(-30, 9 bit)
    // otherwise we get S(30, 9 bit)

// absolute values
val SInt_n_4 = S(-3, 3 bit)
val abs_en = SInt_n_3.abs(booleanDoAbs)
    // if booleanDoAbs is True we get U(3, 3 bit)
    // otherwise we get U"3'b101" or U(5, 3 bit) (raw bit pattern of -3)

val SInt_n_128 = S(-128, 8 bit)
val abs = SInt_n_128.abs
assert(abs === U(128, 8 bit))
val sym_abs = SInt_n_128.absWithSym
assert(sym_abs === U(127, 7 bit))
4.5位提取
所有位提取操作均可用于读取一个位/一组位。与其他 HDL 一样,提取运算符也对 UInt / SInt 的一部分赋值。
| 运算符 | 描述 | 返回类型 |
|---|---|---|
| x(y: Int) | 静态访问第 y 位 | Bool |
| x(y: UInt) | 访问第 y 位,这里y为可变的信号 | Bool |
| x(offset: Int, width bits) | 固定地选择偏移量和宽度,offset 为选择信号中LSB的索引 |
Bits(width bits) |
| x(offset: UInt, width bits) | 选择偏移量可变和宽度固定的信号,offset 为选择信号中LSB的索引 (可为另一信号) |
Bits(width bits) |
| x(range: Range) | 访问Bits的 范围 。例如:myBits(4 downto 2) | Bits(range.size bits) |
| x.subdivideIn(y slices, [strict: Boolean]) | 将x分割为y片,y: Int | Vec(Bits(…), y) |
| x.subdivideIn(y bits, [strict: Boolean]) | 将 x 分割为 y 位的多个切片,y: Int | Vec(Bits(y bit), …) |
| x.msb | 访问 x 的最高有效位(最高索引,SInt 的符号位) | Bool |
| x.lsb | 访问 x 的最低有效位(索引 0) | Bool |
| mySInt.sign | 访问最高符号位,仅适用于 SInt。 | Bool |
一些基本示例:
// get the element at the index 4
val myBool = myUInt(4)
// assign element 1
myUInt(1) := True

// index dynamically
val index = UInt(2 bit)
val indexed = myUInt(index, 2 bit)

// range index
val myUInt_8bit = myUInt_16bit(7 downto 0)
val myUInt_7bit = myUInt_16bit(0 to 6)
val myUInt_6bit = myUInt_16bit(0 until 6)
// assign to myUInt_16bit(3 downto 0)
myUInt_8bit(3 downto 0) := myUInt_4bit

// equivalent slices, no reversing occurs
val a = myUInt_16bit(8 downto 4)
val b = myUInt_16bit(4 to 8)

// read / assign the msb / leftmost bit / x.high bit
val isNegative = mySInt_16bit.sign
myUInt_16bit.msb := False
4.6分割细节
两个 subdivideIn 函数的所有参数都有一个可选参数 strict 参数(即 subdivideIn(slices: SlicesCount, strict: Boolean = true) )。如果 strict 为 true,则如果输入无法等分,将引发错误。如果设置为 false,最后一个元素可能比其他(大小相等)元素小。
// Subdivide
val sel = UInt(2 bits)
val myUIntWord = myUInt_128bits.subdivideIn(32 bits)(sel)
    // sel = 3 => myUIntWord = myUInt_128bits(127 downto 96)
    // sel = 2 => myUIntWord = myUInt_128bits( 95 downto 64)
    // sel = 1 => myUIntWord = myUInt_128bits( 63 downto 32)
    // sel = 0 => myUIntWord = myUInt_128bits( 31 downto  0)

 // If you want to access in reverse order you can do:
 val myVector   = myUInt_128bits.subdivideIn(32 bits).reverse
 val myRevUIntWord = myVector(sel)

 // We can also assign through subdivides
 val output8 = UInt(8 bit)
 val pieces = output8.subdivideIn(2 slices)
 // assign to output8
 pieces(0) := 0xf
 pieces(1) := 0x5
4.7杂项
与上面列出的位提取操作相反,上述函数不能使用其返回值给原始信号赋值。
| 运算符 | 描述 | 返回类型 |
|---|---|---|
| x.getWidth | 返回位数 | Int |
| x.high | 返回 MSB 的索引(对Int来说是允许的最高索引) | Int |
| x.bitsRange | 返回范围(0 到 x.high) | 范围 |
| x.minValue | x 的最低可能值(例如 UInt 为 0) | BigInt |
| x.maxValue | x 的最大可能值 | BigInt |
| x.valueRange | 返回 x 的最小到最大可能值的范围(x.minValue 到 x.maxValue)。 | 范围 |
| x ## y | 连接Bits,x->高位,y->低位 | Bits(w(x) + w(y) bits) |
| x #* n | n次重复x并合并 | Bits(w(x) * n bits) |
| x @@ y | 将 x:T 与 y:Bool/SInt/UInt 连接 | T(w(x) + w(y) bits) |
| x.resize(y) | 返回 x 调整大小后的副本,如果位宽变大,则用零填充其他位 对于 UInt 或 SInt(用符号填充)操作, y: Int |
T(y bits) |
| x.resized | 返回自动位宽调整后的 x 根据需要调整大小 |
T(w(x) bits) |
| x.expand | 返回 x 并进行 1 位扩展 | T(w(x)+1 bits) |
| x.getZero | 返回类型 T 的新实例,该实例被分配与 x 相同宽度的零值(常量)。 | T(0, w(x) bits).clearAll() |
| x.getAllTrue | 返回类型 T 的新实例,该实例被分配了与 x 宽度相同的常量值。 | T(w(x) bits).setAll() |
备注
validRange 只能用于最小值和最大值能够保存在32 位有符号整数的情况下。 (这是由于 Scala scala.collection.immutable.Range 类型使用 Int 作为范围描述)
myBool := mySInt.lsb // equivalent to mySInt(0)
// Concatenation
val mySInt = mySInt_1 @@ mySInt_1 @@ myBool
val myBits = mySInt_1 ## mySInt_1 ## myBool
// Resize
myUInt_32bits := U"32'x112233344"
myUInt_8bits := myUInt_32bits.resized // automatic resize (myUInt_8bits = 0x44)
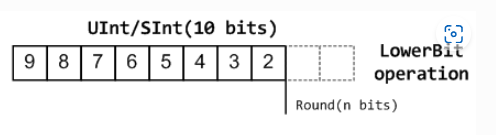
val lowest_8bits = myUInt_32bits.resize(8) // resize to 8 bits (myUInt_8bits = 0x44)3.3定点小数操作
对于定点小数,我们可以将其分为两部分:
- 低位运算(舍入方法)
- 高位运算(饱和运算)
4.1低位运算
| SpinalHDL中的名称 | 维基百科中的名称 | API | 数学算法描述 | 返回类型(align=false) | 支持情况 |
|---|---|---|---|---|---|
| FLOOR | RoundDown | floor | floor(x) | w(x)-n bits | 是 |
| FLOORTOZERO | RoundToZero | floorToZero | sign*floor(abs(x)) | w(x)-n bits | 是 |
| CEIL | RoundUp | ceil | ceil(x) | w(x)-n+1 bits | 是 |
| CEILTOINF | RoundToInf | ceilToInf | sign*ceil(abs(x)) | w(x)-n+1 bits | 是 |
| ROUNDUP | RoundHalfUp | roundUp | floor(x+0.5) | w(x)-n+1 bits | 是 |
| ROUNDDOWN | RoundHalfDown | roundDown | ceil(x-0.5) | w(x)-n+1 bits | 是 |
| ROUNDTOZERO | RoundHalfToZero | roundToZero | sign*ceil(abs(x)-0.5) | w(x)-n+1 bits | 是 |
| ROUNDTOINF | RoundHalfToInf | roundToInf | sign*floor(abs(x)+0.5) | w(x)-n+1 bits | 是 |
| ROUNDTOEVEN | RoundHalfToEven | roundToEven | 不支持 | ||
| ROUNDTOODD | RoundHalfToOdd | roundToOdd | 不支持 |
备注
RoundToEven 和 RoundToOdd 模式非常特殊,用于一些精度要求较高的大数据统计领域,SpinalHDL 尚不支持。
你会发现 ROUNDUP、ROUNDDOWN、ROUNDTOZERO、ROUNDTOINF、ROUNDTOEVEN、ROUNTOODD 在行为上非常接近,ROUNDTOINF 是最常见的。不同编程语言中的舍入行为可能不同。
| 编程语言 | 默认舍入类型 | 示例 | 评论 |
|---|---|---|---|
| Matlab | ROUNDTOINF | round(1.5)=2,round(2.5)=3;round(-1.5)=-2,round(-2.5)=-3 | 四舍五入至±无穷大 |
| python2 | ROUNDTOINF | round(1.5)=2,round(2.5)=3;round(-1.5)=-2,round(-2.5)=-3 | 四舍五入至±无穷大 |
| 蟒蛇3 | ROUNDTOEVEN | round(1.5)=round(2.5)=2; round(-1.5)=round(-2.5)=-2 | 向偶数舍入 |
| Scala.math | ROUNDTOUP | round(1.5)=2,round(2.5)=3;round(-1.5)=-1,round(-2.5)=-2 | 永远向正无穷舍入 |
| SpinalHDL | ROUNDTOINF | round(1.5)=2,round(2.5)=3;round(-1.5)=-2,round(-2.5)=-3 | 四舍五入至±无穷大 |
备注
在 SpinalHDL 中,ROUNDTOINF 是默认的舍入类型 (round = roundToInf)
val A  = SInt(16 bits)
val B  = A.roundToInf(6 bits)         // default 'align = false' with carry, got 11 bit
val B  = A.roundToInf(6 bits, align = true) // sat 1 carry bit, got 10 bit
val B  = A.floor(6 bits)              // return 10 bit
val B  = A.floorToZero(6 bits)        // return 10 bit
val B  = A.ceil(6 bits)               // ceil with carry so return 11 bit
val B  = A.ceil(6 bits, align = true) // ceil with carry then sat 1 bit return 10 bit
val B  = A.ceilToInf(6 bits)
val B  = A.roundUp(6 bits)
val B  = A.roundDown(6 bits)
val B  = A.roundToInf(6 bits)
val B  = A.roundToZero(6 bits)
val B  = A.round(6 bits)              // SpinalHDL uses roundToInf as the default rounding mode

val B0 = A.roundToInf(6 bits, align = true)         //  ---+
                                                    //     |--> equal
val B1 = A.roundToInf(6 bits, align = false).sat(1) //  ---+
备注
只有 floor 和 floorToZero 可以在没有 align 选项的情况下工作;他们不需要进位位。其他舍入操作默认使用进位位。
round api
| API | UInt/SInt | 描述 | 返回类型(align=false) | 返回类型(align=true) |
|---|---|---|---|---|
| floor | 均支持 | w(x)-n bits | w(x)-n bits | |
| floorToZero | SInt | 等于 UInt 类型的下限 | w(x)-n bits | w(x)-n bits |
| ceil | 均支持 | w(x)-n+1 bits | w(x)-n bits | |
| ceilToInf | SInt | 等于 UInt 类型的 ceil值 | w(x)-n+1 bits | w(x)-n bits |
| roundUp | 均支持 | 硬件实现简单 | w(x)-n+1 bits | w(x)-n bits |
| roundDown | 均支持 | w(x)-n+1 bits | w(x)-n bits | |
| roundToInf | SInt | 最常使用 | w(x)-n+1 bits | w(x)-n bits |
| roundToZero | SInt | 等于 UInt 类型的roundDown | w(x)-n+1 bits | w(x)-n bits |
| round | 均支持 | SpinalHDL 中等效于 roundToInf | w(x)-n+1 bits | w(x)-n bits |
备注
虽然 roundToInf 很常见,但 roundUp 的成本最低,时序也好,几乎没有性能损失。因此,强烈建议在生产环境中使用 roundUp 。
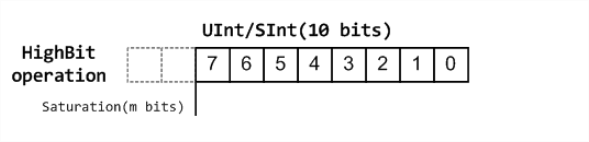
4.2高位操作
| 函数 | 操作 | 正向操作 | 负向操作 |
|---|---|---|---|
| sat | 饱和化 | 当(Top[w-1, w-n].orR)为真时设置为maxValue | 当(Top[w-1, w-n].andR)为真时设置为 minValue |
| trim | 丢弃 | 不适用 | 不适用 |
| symmetry | 获取对称值 | 不适用 | 最小值 = -最大值 |
对称仅对 SInt 有效。
val A  = SInt(8 bits)
val B  = A.sat(3 bits)      // return 5 bits with saturated highest 3 bits
val B  = A.sat(3)           // equal to sat(3 bits)
val B  = A.trim(3 bits)     // return 5 bits with the highest 3 bits discarded
val B  = A.trim(3 bits)     // return 5 bits with the highest 3 bits discarded
val C  = A.symmetry         // return 8 bits and symmetry as (-128~127 to -127~127)
val C  = A.sat(3).symmetry  // return 5 bits and symmetry as (-16~15 to -15~15)
4.3 fixTo函数**
UInt/SInt 中提供了两种方法来实现定点小数位宽变化:
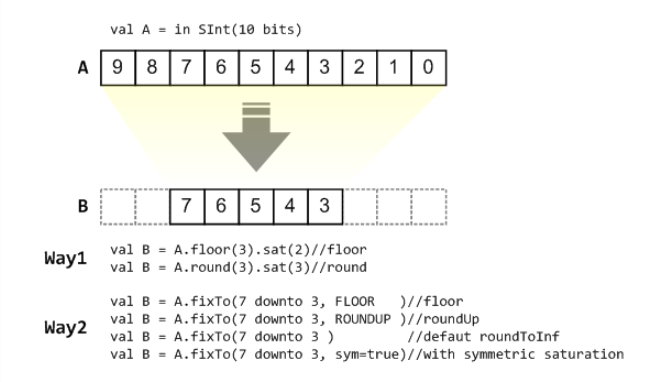
在 RTL 工作中强烈建议使用 fixTo 函数,您不需要像上图中的 Way1 那样手动处理进位对齐和位宽计算。
带自动饱和功能的定点数生成函数:
| 函数 | 描述 | 返回类型 |
|---|---|---|
| fixTo(section, roundType, symmetric) | 定点数生成 | section.size bits |
val A  = SInt(16 bits)
val B  = A.fixTo(10 downto 3) // default RoundType.ROUNDTOINF, sym = false
val B  = A.fixTo( 8 downto 0, RoundType.ROUNDUP)
val B  = A.fixTo( 9 downto 3, RoundType.CEIL,       sym = false)
val B  = A.fixTo(16 downto 1, RoundType.ROUNDTOINF, sym = true )
val B  = A.fixTo(10 downto 3, RoundType.FLOOR) // floor 3 bit, sat 5 bit @ highest
val B  = A.fixTo(20 downto 3, RoundType.FLOOR) // floor 3 bit, expand 2 bit @ highest
2.4SpinalEnum
3.1描述
Enumeration (枚举)类型对应于命名值的列表
3.2声明
枚举数据类型的声明如下:
object Enumeration extends SpinalEnum {
  val element0, element1, ..., elementN = newElement()
}
在上面的示例中,使用的是默认编码。VHDL (默认)使用本地枚举类型,Verilog (默认)使用二进制编码。
可以通过如下定义来强制设置指定枚举的编码:
object Enumeration extends SpinalEnum(defaultEncoding=encodingOfYourChoice) {
  val element0, element1, ..., elementN = newElement()
}
备注
如果要将枚举定义为给定组件的 in/out,则必须执行以下操作: in(MyEnum()) 或 out(MyEnum())
编码
支持以下枚举编码:
| 编码 | 位宽 | 描述 |
|---|---|---|
native |
使用VHDL枚举系统,这是默认编码 | |
binarySequential |
log2Up(stateCount) |
使用 Bits 按声明顺序存储状态(值从 0 到 n-1) |
binaryOneHot |
stateCount | 使用位来存储状态。每一位对应一个状态,在硬件编码状态表示中一次仅设置一位。 |
graySequential |
log2Up(stateCount) |
将索引(像 binarySequential 中使用的数)编码为二进制格雷码。 |
自定义编码可以通过两种不同的方式执行:静态或动态。
/*
 * Static encoding
 */
object MyEnumStatic extends SpinalEnum {
  val e0, e1, e2, e3 = newElement()
  defaultEncoding = SpinalEnumEncoding("staticEncoding")(
    e0 -> 0,
    e1 -> 2,
    e2 -> 3,
    e3 -> 7)
}

/*
 * Dynamic encoding with the function :  _ * 2 + 1
 *   e.g. : e0 => 0 * 2 + 1 = 1
 *          e1 => 1 * 2 + 1 = 3
 *          e2 => 2 * 2 + 1 = 5
 *          e3 => 3 * 2 + 1 = 7
 */
val encoding = SpinalEnumEncoding("dynamicEncoding", _ * 2 + 1)

object MyEnumDynamic extends SpinalEnum(encoding) {
  val e0, e1, e2, e3 = newElement()
}
示例
实例化一个枚举信号并为其赋值:
object UartCtrlTxState extends SpinalEnum {
  val sIdle, sStart, sData, sParity, sStop = newElement()
}

val stateNext = UartCtrlTxState()
stateNext := UartCtrlTxState.sIdle

// You can also import the enumeration to have visibility of its elements
import UartCtrlTxState._
stateNext := sIdle
3.3运算符
以下运算符可用于 Enumeration 类型:
4.1比较运算
| 运算符 | 描述 | 返回类型 |
|---|---|---|
| x === y | 等价性判断 | Bool |
| x =/= y | 不等价判断运算 | Bool |
import UartCtrlTxState._

val stateNext = UartCtrlTxState()
stateNext := sIdle

when(stateNext === sStart) {
  ...
}

switch(stateNext) {
  is(sIdle) {
    ...
  }
  is(sStart) {
    ...
  }
  ...
}
4.2类型
为了使用枚举(例如在函数中),您可能需要其类型。
值的类型(例如 sIdle 的类型)是
spinal.core.SpinalEnumElement[UartCtrlTxState.type]或等效的
UartCtrlTxState.E线束类型(例如 stateNext 的类型)是
spinal.core.SpinalEnumCraft[UartCtrlTxState.type]或等效的
UartCtrlTxState.C4.3类型转换
| 运算符 | 描述 | 返回类型 |
|---|---|---|
| x.asBits | 二进制转换为 Bits | Bits(w(x) bits) |
| x.asBits.asUInt | 二进制转换为 UInt | UInt(w(x) bits) |
| x.asBits.asSInt | 二进制转换为SInt | SInt(w(x) bits) |
| e.assignFromBits(bits) | Bits转换为枚举 | MyEnum() |
import UartCtrlTxState._

val stateNext = UartCtrlTxState()
myBits := sIdle.asBits

stateNext.assignFromBits(myBits)
2.5Bundle***
3.1描述
Bundle 是一种复合类型,它在单个名称下定义一组具有命名的信号(任何 SpinalHDL 基本类型)。
Bundle 可用于对数据结构、总线和接口进行建模。
3.2声明
声明线束的语法如下:
case class myBundle extends Bundle {
  val bundleItem0 = AnyType
  val bundleItem1 = AnyType
  val bundleItemN = AnyType
}
例如,包含颜色的线束可以定义为:
case class Color(channelWidth: Int) extends Bundle {
  val r, g, b = UInt(channelWidth bits)
}
您可以在 Spinal HDL examples 中找到 APB3 definition 。
4.1条件信号
Bundle 中的信号可以有条件地定义。除非 dataWidth 大于 0,否则在实力细化后的 myBundle中将不会有 data 信号,如下例所示。
case class myBundle(dataWidth: Int) extends Bundle {
  val data = (dataWidth > 0) generate (UInt(dataWidth bits))
}
备注
另请参阅 generate 了解有关此 SpinalHDL 方法的信息。
3.3运算符
以下运算符可用于 Bundle 类型:
4.1比较运算
| 运算符 | 描述 | 返回类型 |
|---|---|---|
| x === y | 等价性判断 | Bool |
| x =/= y | 不等价判断运算 | Bool |
val color1 = Color(8)
color1.r := 0
color1.g := 0
color1.b := 0

val color2 = Color(8)
color2.r := 0
color2.g := 0
color2.b := 0

myBool := color1 === color2  // Compare all elements of the bundle
// is equivalent to:
// myBool := color1.r === color2.r && color1.g === color2.g && color1.b === color2.b
4.2类型转换
| 运算符 | 描述 | 返回类型 |
|---|---|---|
| x.asBits | 二进制转换为 Bits | Bits(w(x) bits) |
val color1 = Color(8)
val myBits := color1.asBits
线束中的元素将按其定义的顺序映射到位,按LSB 先放置的顺序。因此,color1 中的 r 将占据 myBits 的第 0 至 8 位(LSB),然后依次是 g 和 b ,b.msb 也是最终 Bits 类型的 MSB。
4.3将位转换回线束
.assignFromBits 运算符可以被视为 .asBits 的逆操作。
| 运算符 | 描述 | 返回类型 |
|---|---|---|
| x.assignFromBits(y) | 将Bits (y)转换为Bundle(x) | Unit |
| x.assignFromBits(y, hi, lo) | 将Bits (y) 转换为具有高/低边界的 Bundle(x) | Unit |
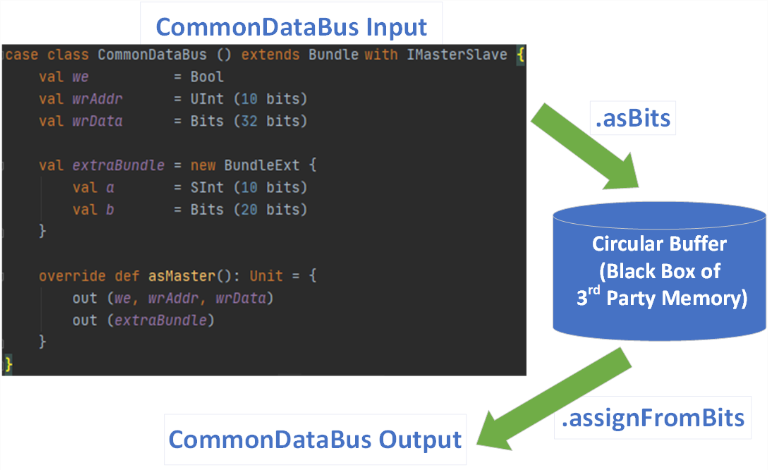
下面的示例将名为 CommonDataBus 的线束保存到循环缓冲区(第三方内存)中,随后读出比特,并将其转换回 CommonDataBus 格式。
case class TestBundle () extends Component {
  val io = new Bundle {
    val we      = in     Bool()
    val addrWr  = in     UInt (7 bits)
    val dataIn  = slave  (CommonDataBus())

    val addrRd  = in     UInt (7 bits)
    val dataOut = master (CommonDataBus())
  }

  val mm = Ram3rdParty_1w_1rs (G_DATA_WIDTH = io.dataIn.getBitsWidth,
                               G_ADDR_WIDTH = io.addrWr.getBitsWidth,
                               G_VENDOR     = "Intel_Arria10_M20K")

  mm.io.clk_in    := clockDomain.readClockWire
  mm.io.clk_out   := clockDomain.readClockWire

  mm.io.we        := io.we
  mm.io.addr_wr   := io.addrWr.asBits
  mm.io.d         := io.dataIn.asBits

  mm.io.addr_rd   := io.addrRd.asBits
  io.dataOut.assignFromBits(mm.io.q)
}
3.4 IO元件方向**
当您在组件的 IO 定义中实现 Bundle 时需要指定其方向。
4.1 in/out
如果线束的所有元素中的信号都朝同一方向传播,则可以使用 in(MyBundle()) or out(MyBundle())。
例如:
val io = new Bundle {
  val input  = in (Color(8))
  val output = out(Color(8))
}
4.2master/slave
如果您的接口遵循主/从拓扑结构,您可以使用 IMasterSlave 特征。然后你必须实现函数 def asMaster(): Unit 从master的角度设置每个元素的方向。然后你可以在 IO 定义中使用 master(MyBundle()) 和 slave(MyBundle()) 语法来使用。
有些函数定义为 toXXX,例如 Flow 类的 toStream 方法。这些函数通常可以由master端调用。另外,fromXXX函数是为slave侧设计的。通常master端可用的功能多于slave端。
case class HandShake(payloadWidth: Int) extends Bundle with IMasterSlave {
  val valid   = Bool()
  val ready   = Bool()
  val payload = Bits(payloadWidth bits)

  // You have to implement this asMaster function.
  // This function should set the direction of each signals from an master point of view
  override def asMaster(): Unit = {
    out(valid, payload)
    in(ready)
  }
}

val io = new Bundle {
  val input  = slave(HandShake(8))
  val output = master(HandShake(8))
}
2.6 Vec
3.1描述
Vec 是一种复合类型,它在一个变量中定义一组可索引的信号(任何 SpinalHDL 基本类型)。
3.2声明
声明向量的语法如下:
| 声明 | 描述 |
|---|---|
| Vec.fill(size: Int)(type: Data) | 创建一个包含 size 个元素的 Data 类型向量 |
| Vec(x, y, …) | 创建一个向量,其中索引指向提供的元素。 不会创建新的硬件信号。 此构造函数支持混合宽度的元素。 |
// Create a vector of 2 signed integers
val myVecOfSInt = Vec.fill(2)(SInt(8 bits))
myVecOfSInt(0) := 2                   // assignment to populate index 0
myVecOfSInt(1) := myVecOfSInt(0) + 3  // assignment to populate index 1

// Create a vector of 3 different type elements
val myVecOfMixedUInt = Vec(UInt(3 bits), UInt(5 bits), UInt(8 bits))

val x, y, z = UInt(8 bits)
val myVecOf_xyz_ref = Vec(x, y, z)

// Iterate on a vector
for(element <- myVecOf_xyz_ref) {
  element := 0   // Assign x, y, z with the value 0
}

// Map on vector
myVecOfMixedUInt.map(_ := 0) // Assign all elements with value 0

// Assign 3 to the first element of the vector
myVecOf_xyz_ref(1) := 3
3.3运算符
以下运算符可用于 Vec 类型:
4.1比较运算
| 运算符 | 描述 | 返回类型 |
|---|---|---|
| x === y | 等价性判断 | Bool |
| x =/= y | 不等价判断运算 | Bool |
// Create a vector of 2 signed integers
val vec2 = Vec.fill(2)(SInt(8 bits))
val vec1 = Vec.fill(2)(SInt(8 bits))

myBool := vec2 === vec1  // Compare all elements
// is equivalent to:
// myBool := vec2(0) === vec1(0) && vec2(1) === vec1(1)
4.2类型转换
| 运算符 | 描述 | 返回类型 |
|---|---|---|
| x.asBits | 二进制转换为 Bits | Bits(w(x) bits) |
// Create a vector of 2 signed integers
val vec1 = Vec.fill(2)(SInt(8 bits))

myBits_16bits := vec1.asBits
4.3杂项
| 运算符 | 描述 | 返回类型 |
|---|---|---|
| x.getBitsWidth | 返回 Vec 的完整大小 | Int |
// Create a vector of 2 signed integers
val vec1 = Vec.fill(2)(SInt(8 bits))

println(widthOf(vec1)) // 16
4.4库辅助函数
备注
您需要以 import spinal.lib._ 导入库,以将这些函数置于作用域中。
| 运算符 | 描述 | 返回类型 |
|---|---|---|
| x.sCount(condition: T => Bool) | Count the number of occurrence matching a given condition in the Vec. | UInt |
| x.sCount(value: T) | Count the number of occurrence of a value in the Vec.计算某个值在Vec中出现的次数 | UInt |
| x.sExists(condition: T => Bool) | 检查Vec中是否存在匹配条件的元素。 | Bool |
| x.sContains(value: T) | 检查 Vec 中是否存在具有给定值的元素。 | Bool |
| x.sFindFirst(condition: T => Bool) | 查找 Vec 中符合给定条件的第一个元素,如果成功找到,则返回该元素的索引。 | (Bool, UInt) |
| x.reduceBalancedTree(op: (T, T) => T) | 具有自动平衡功能的reduce函数,尽量减少生成电路的深度。 op 应该是具有可交换性和可结合性的。 |
T |
| x.shuffle(indexMapping: Int => Int) | 使用将旧索引映射到新索引的函数对 Vec 进行混洗(shuffle)。 | Vec[T] |
import spinal.lib._

// Create a vector with 4 unsigned integers
val vec1 = Vec.fill(4)(UInt(8 bits))

// ... the vector is actually assigned somewhere

val c1: UInt = vec1.sCount(_ < 128) // how many values are lower than 128 in vec
val c2: UInt = vec1.sCount(0) // how many values are equal to zero in vec

val b1: Bool = vec1.sExists(_ > 250) // is there a element bigger than 250
val b2: Bool = vec1.sContains(0) // is there a zero in vec

val (u1Found, u1): (Bool, UInt) = vec1.sFindFirst(_ < 10) // get the index of the first element lower than 10
val u2: UInt = vec1.reduceBalancedTree(_ + _) // sum all elements together
备注
sXXX 前缀用于消除使用 lambda 函数作为参数的同名 Scala 函数带来的歧义
1.2结构设计*
2.1组件和结构设计
像在VHDL和Verilog中一样,可以使用组件构建设计层次结构。然而,在SpinalHDL中,不需要在实例化时绑定它们的端口:
class AdderCell() extends Component {
  // Declaring external ports in a Bundle called io is recommended
  val io = new Bundle {
    val a, b, cin = in port Bool()
    val sum, cout = out port Bool()
  }
  // Do some logic
  io.sum := io.a ^ io.b ^ io.cin
  io.cout := (io.a & io.b) | (io.a & io.cin) | (io.b & io.cin)
}

class Adder(width: Int) extends Component {
  ...
  // Create 2 AdderCell instances
  val cell0 = new AdderCell()
  val cell1 = new AdderCell()
  cell1.io.cin := cell0.io.cout   // Connect cout of cell0 to cin of cell1

  // Another example which creates an array of ArrayCell instances
  val cellArray = Array.fill(width)(new AdderCell())
  cellArray(1).io.cin := cellArray(0).io.cout   // Connect cout of cell(0) to cin of cell(1)
  ...
}
小技巧
val io = new Bundle { ... }
建议在名为 io 的 Bundle 中声明外部端口。如果您将线束命名为 io,SpinalHDL 将检查其所有元素是否定义为输入或输出。
小技巧
如果更符合您的风格,您也可以使用 Module 语法而不是 Component (它们是相同的东西)
3.1输入输出定义
定义输入和输出的语法如下:
| 语法 | 描述 | 返回类型 |
|---|---|---|
in port Bool()out port Bool() |
创建输入 Bool/输出 Bool | Bool |
in Bits/UInt/SInt[(x bits)]out Bits/UInt/SInt[(x bits)]in Bits(3 bits) |
创建相应类型的输入/输出端口 | Bits/UInt/SInt |
in(T)out(T) |
对于所有其他数据类型,您可能需要在其周围添加一些括号。这是 Scala 的限制。 | T |
master(T)slave(T)master(Bool()) |
此语法由 spinal.lib 库提供(如果您使用 slave 语法标注对象,则应导入 spinal.lib.slave)。 T 必须继承自 IMasterSlave。一些参考文档在 这里 。您实际上可能不需要括号,因此写成 master T 也可以。 |
T |
组件之间的互连需要遵循一些规则:
- 组件只能 读取 子组件的输出和输入信号。
- 组件可以读取自己的输出端口值(与 VHDL 不同)。
小技巧
如果由于某种原因您需要从层次结构中较深的位置读取信号(例如用于调试或临时补丁),您可以使用 some.where.else.theSignal.pull() 函数返回的信号来完成此操作
3.2裁剪信号
SpinalHDL will generate all the named signals and their dependencies, while all the useless anonymous / zero width ones are removed from the RTL generation.
您可以通过生成的 SpinalReport 对象上的 printPruned 和 printPrunedIo 函数收集所有已删除的无用信号列表:
class TopLevel extends Component {
  val io = new Bundle {
    val a,b = in port UInt(8 bits)
    val result = out port UInt(8 bits)
  }

  io.result := io.a + io.b

  val unusedSignal = UInt(8 bits)
  val unusedSignal2 = UInt(8 bits)

  unusedSignal2 := unusedSignal
}

object Main {
  def main(args: Array[String]) {
    SpinalVhdl(new TopLevel).printPruned()
    // This will report :
    //  [Warning] Unused signal detected : toplevel/unusedSignal : UInt[8 bits]
    //  [Warning] Unused signal detected : toplevel/unusedSignal2 : UInt[8 bits]
  }
}
3.3参数化硬件(VHDL 中的“Generic”,Verilog 中的“Parameter”)
如果你想参数化你的组件,你可以将参数传递给组件的构造函数,如下所示:
class MyAdder(width: BitCount) extends Component {
  val io = new Bundle {
    val a, b   = in port UInt(width)
    val result = out port UInt(width)
  }
  io.result := io.a + io.b
}

object Main {
  def main(args: Array[String]) {
    SpinalVhdl(new MyAdder(32 bits))
  }
}
如果您有多个参数,最好给出一个专用的配置类,如下所示:
case class MySocConfig(axiFrequency  : HertzNumber,
                       onChipRamSize : BigInt,
                       cpu           : RiscCoreConfig,
                       iCache        : InstructionCacheConfig)

class MySoc(config: MySocConfig) extends Component {
  ...
}
您可以在配置中添加功能以及对配置属性的要求:
case class MyBusConfig(addressWidth: Int, dataWidth: Int) {
  def bytePerWord = dataWidth / 8
  def addressType = UInt(addressWidth bits)
  def dataType = Bits(dataWidth bits)

  require(dataWidth == 32 || dataWidth == 64, "Data width must be 32 or 64")
}
备注
这种参数化完全发生在 SpinalHDL 代码生成的实例细化过程中。生成的 HDL 代码不包含使用HDL语言泛化特性的内容。此处描述的方法不会使用 VHDL 泛型或 Verilog 参数。
另请参阅 Blackbox 了解有关该机制支持的更多信息。
3.4综合后组件名称
在模块内,每个组件都有一个名称,称为“部分名称”。 “完整”名称是通过将每个组件的父名称与“_ ”连接起来构建的,例如:io_clockDomain_reset。您可以使用 setName 将按此约定生成的名称替换为自定义的。这在与外部组件连接时特别有用。其他方法分别称为 getName、setPartialName 和 getPartialName。
综合时,每个模块都会获得定义它的 Scala 类的名称。您也可以调用 setDefinitionName 函数来覆盖它。
2.2Area
有时,创建一个 Component 组件来定义某些逻辑是多余的,因为:
- 需要定义所有构造参数和IO(冗长、重复)
- 拆分您的代码(超出需求)
对于这种情况,您可以使用 Area 来定义一组信号/逻辑:
class UartCtrl extends Component {
  ...
  val timer = new Area {
    val counter = Reg(UInt(8 bits))
    val tick = counter === 0
    counter := counter - 1
    when(tick) {
      counter := 100
    }
  }

  val tickCounter = new Area {
    val value = Reg(UInt(3 bits))
    val reset = False
    when(timer.tick) {          // Refer to the tick from timer area
      value := value + 1
    }
    when(reset) {
      value := 0
    }
  }

  val stateMachine = new Area {
    ...
  }
}
2.3函数
使用 Scala 函数生成硬件的方式与 VHDL/Verilog 完全不同,原因有很多:
- 您可以实例化寄存器、组合逻辑以及其中的组件。
- 您不必使用限制信号赋值范围的
process/@always块。 - 一切都通过引用传递,这允许简化操作。
例如,您可以将总线作为参数提供给函数,然后该函数可以在内部对其进行读/写。您还可以从 Scala 世界(函数、类型等)返回组件、总线或任何其他内容。3.1RGB信号转灰度信号
例如,如果您想使用系数将红/绿/蓝颜色转换为灰度,您可以使用函数来完成:
// Input RGB color
val r, g, b = UInt(8 bits)
// Define a function to multiply a UInt by a Scala Float value.
def coef(value: UInt, by: Float): UInt = (value U((255 by).toInt, 8 bits) >> 8)
// Calculate the gray level
val gray = coef(r, 0.3f) + coef(g, 0.4f) + coef(b, 0.3f)
### 3.2Valid Ready Payload 总线
例如,如果您定义一个带有 valid, ready 和 payload 信号的简单总线,则可以在其中定义一些有用的函数。
```scala
case class MyBus(payloadWidth: Int) extends Bundle with IMasterSlave {
val valid = Bool()
val ready = Bool()
val payload = Bits(payloadWidth bits)
// Define the direction of the data in a master mode
override def asMaster(): Unit = {
out(valid, payload)
in(ready)
}
// Connect that to this
def <<(that: MyBus): Unit = {
this.valid := that.valid
that.ready := this.ready
this.payload := that.payload
}
// Connect this to the FIFO input, return the fifo output
def queue(size: Int): MyBus = {
val fifo = new MyBusFifo(payloadWidth, size)
fifo.io.push << this
return fifo.io.pop
}
}
class MyBusFifo(payloadWidth: Int, depth: Int) extends Component {
val io = new Bundle {
val push = slave(MyBus(payloadWidth))
val pop = master(MyBus(payloadWidth))
}
val mem = Mem(Bits(payloadWidth bits), depth)
// ...
}</code></pre>
<h2>2.4时钟域**</h2>
<h3>3.1简介</h3>
<p>在 SpinalHDL 中,时钟和复位信号可以组合起来创建<strong>时钟域</strong>。时钟域可以应用于设计的某些区域,然后实例化到这些区域中的所有同步元件将<strong>隐式</strong>使用该时钟域。</p>
<p>时钟域的应用方式类似于堆栈,这意味着当您的设计位于给定时钟域中,您仍然可以将该设计应用到另一个时钟域。</p>
<p>请注意,寄存器在创建时捕获其时钟域,而不是在赋值时捕获。因此,请确保在所需的 <code>ClockingArea</code> 内创建它们。</p>
<h3>3.2实例化</h3>
<p>定义时钟域的语法如下(使用EBNF语法):</p>
<pre><code class="language-scala">ClockDomain(
clock: Bool
[,reset: Bool]
[,softReset: Bool]
[,clockEnable: Bool]
[,frequency: IClockDomainFrequency]
[,config: ClockDomainConfig]
)</code></pre>
<p>这个定义有五个参数:</p>
<table>
<thead>
<tr>
<th>参数</th>
<th>描述</th>
<th>默认值</th>
</tr>
</thead>
<tbody>
<tr>
<td><code>clock</code></td>
<td>定义时钟域中的时钟信号</td>
<td></td>
</tr>
<tr>
<td><code>reset</code></td>
<td>复位信号。如果存在需要复位的寄存器,而时钟域没有提供复位,则会显示错误消息</td>
<td>null</td>
</tr>
<tr>
<td><code>softReset</code></td>
<td>复位意味着额外的同步复位</td>
<td>null</td>
</tr>
<tr>
<td><code>clockEnable</code></td>
<td>该信号的目标是禁用整个时钟域上的时钟,而无需在每个同步元件上手动实现</td>
<td>null</td>
</tr>
<tr>
<td><code>frequency</code></td>
<td>允许您指定给定时钟域的频率,然后在您的设计中读取它。该参数不生成PLL或其他硬件来控制频率</td>
<td>UnknownFrequency</td>
</tr>
<tr>
<td><code>config</code></td>
<td>指定信号的极性和复位的性质</td>
<td>当前配置</td>
</tr>
</tbody>
</table>
<p>在设计中定义具有指定属性时钟域的示例如下:</p>
<pre><code class="language-scala">val coreClock = Bool()
val coreReset = Bool()
// Define a new clock domain
val coreClockDomain = ClockDomain(coreClock, coreReset)
// Use this domain in an area of the design
val coreArea = new ClockingArea(coreClockDomain) {
val coreClockedRegister = Reg(UInt(4 bits))
}</code></pre>
<p>当不需要 Area 时,也可以直接应用时钟域。存在两种语法:</p>
<pre><code class="language-scala">class Counters extends Component {
val io = new Bundle {
val enable = in Bool ()
val freeCount, gatedCount, gatedCount2 = out UInt (4 bits)
}
val freeCounter = CounterFreeRun(16)
io.freeCount := freeCounter.value
// In a real design consider using a glitch free single purpose CLKGATE primitive instead
val gatedClk = ClockDomain.current.readClockWire && io.enable
val gated = ClockDomain(gatedClk, ClockDomain.current.readResetWire)
// Here the "gated" clock domain is applied on "gatedCounter" and "gatedCounter2"
val gatedCounter = gated(CounterFreeRun(16))
io.gatedCount := gatedCounter.value
val gatedCounter2 = gated on CounterFreeRun(16)
io.gatedCount2 := gatedCounter2.value
assert(gatedCounter.value === gatedCounter2.value, "gated count mismatch")
}</code></pre>
<h4>4.1配置*</h4>
<p>除了 <a href="https://spinalhdl.github.io/SpinalDoc-RTD/zh_CN/master/SpinalHDL/Structuring/clock_domain.html#clock-domain-instantiation">构造函数参数</a>之外,每个时钟域的以下元素都可以通过 <code>ClockDomainConfig</code>类进行配置:</p>
<table>
<thead>
<tr>
<th>属性</th>
<th>有效值</th>
</tr>
</thead>
<tbody>
<tr>
<td><code>clockEdge</code></td>
<td><code>RISING</code>, <code>FALLING</code></td>
</tr>
<tr>
<td><code>resetKind</code></td>
<td>某些 FPGA 支持的 <code>ASYNC</code>、 <code>SYNC</code>和 <code>BOOT</code> (其中 FF 值由比特流加载)</td>
</tr>
<tr>
<td><code>resetActiveLevel</code></td>
<td><code>HIGH</code>, <code>LOW</code></td>
</tr>
<tr>
<td><code>softResetActiveLevel</code></td>
<td><code>HIGH</code>, <code>LOW</code></td>
</tr>
<tr>
<td><code>clockEnableActiveLevel</code></td>
<td><code>HIGH</code>, <code>LOW</code></td>
</tr>
</tbody>
</table>
<pre><code class="language-scala">class CustomClockExample extends Component {
val io = new Bundle {
val clk = in Bool()
val resetn = in Bool()
val result = out UInt (4 bits)
}
// Configure the clock domain
val myClockDomain = ClockDomain(
clock = io.clk,
reset = io.resetn,
config = ClockDomainConfig(
clockEdge = RISING,
resetKind = ASYNC,
resetActiveLevel = LOW
)
)
// Define an Area which use myClockDomain
val myArea = new ClockingArea(myClockDomain) {
val myReg = Reg(UInt(4 bits)) init(7)
myReg := myReg + 1
io.result := myReg
}
}</code></pre>
<p>默认情况下, <code>ClockDomain</code> 应用于整个设计。该默认域的配置为:</p>
<ul>
<li>Clock:上升沿</li>
<li>Reset :异步,高电平有效</li>
<li>无时钟使能</li>
</ul>
<p>这对应于以下 <code>ClockDomainConfig</code>:</p>
<pre><code class="language-scala">val defaultCC = ClockDomainConfig(
clockEdge = RISING,
resetKind = ASYNC,
resetActiveLevel = HIGH
)</code></pre>
<h4>4.2内部时钟</h4>
<p>另一种创建时钟域的语法如下:</p>
<pre><code class="language-scala">ClockDomain.internal(
name: String,
[config: ClockDomainConfig,]
[withReset: Boolean,]
[withSoftReset: Boolean,]
[withClockEnable: Boolean,]
[frequency: IClockDomainFrequency]
)</code></pre>
<p>该定义有六个参数:</p>
<table>
<thead>
<tr>
<th>参数</th>
<th>描述</th>
<th>默认值</th>
</tr>
</thead>
<tbody>
<tr>
<td><code>name</code></td>
<td>clk 和 reset 信号的名称</td>
</tr>
<tr>
<td><code>config</code></td>
<td>指定信号的极性和复位的性质</td>
<td>当前配置</td>
</tr>
<tr>
<td><code>withReset</code></td>
<td>添加复位信号</td>
<td>true</td>
</tr>
<tr>
<td><code>withSoftReset</code></td>
<td>添加软复位信号</td>
<td>false</td>
</tr>
<tr>
<td><code>withClockEnable</code></td>
<td>添加时钟使能</td>
<td>false</td>
</tr>
<tr>
<td><code>frequency</code></td>
<td>时钟域频率</td>
<td>UnknownFrequency</td>
</tr>
</tbody>
</table>
<p>这种方法的优点是使用已知/指定的名称而不是继承的名称来创建时钟和复位信号。
创建后,您必须分配 <code>ClockDomain</code> 的信号,如下例所示:</p>
<pre><code class="language-scala">class InternalClockWithPllExample extends Component {
val io = new Bundle {
val clk100M = in Bool()
val aReset = in Bool()
val result = out UInt (4 bits)
}
// myClockDomain.clock will be named myClockName_clk
// myClockDomain.reset will be named myClockName_reset
val myClockDomain = ClockDomain.internal("myClockName")
// Instantiate a PLL (probably a BlackBox)
val pll = new Pll()
pll.io.clkIn := io.clk100M
// Assign myClockDomain signals with something
myClockDomain.clock := pll.io.clockOut
myClockDomain.reset := io.aReset || !pll.io.
// Do whatever you want with myClockDomain
val myArea = new ClockingArea(myClockDomain) {
val myReg = Reg(UInt(4 bits)) init(7)
myReg := myReg + 1
io.result := myReg
}
}</code></pre>
<p><strong>警告</strong>
在您创建时钟域的其他组件中,您不得使用 <code>.clock</code> 和 <code>.reset</code>,而应使用 <code>.readClockWire</code> 和 <code>.readResetWire</code> ,如下所示。对于全局时钟域,您必须始终使用这些 <code>.readXXX</code> 函数。</p>
<h4>4.3外部时钟</h4>
<p>您可以在源中的任何位置定义由外部驱动的时钟域。然后,它会自动将时钟和复位线从顶层输入添加到所有同步元件。</p>
<pre><code class="language-scala">ClockDomain.external(
name: String,
[config: ClockDomainConfig,]
[withReset: Boolean,]
[withSoftReset: Boolean,]
[withClockEnable: Boolean,]
[frequency: IClockDomainFrequency]
)</code></pre>
<p><code>ClockDomain.external</code> 函数的参数与 <code>ClockDomain.internal</code> 函数中的参数完全相同。下面是使用 <code>ClockDomain.external</code> 的设计示例:</p>
<pre><code class="language-scala">class ExternalClockExample extends Component {
val io = new Bundle {
val result = out UInt (4 bits)
}
// On the top level you have two signals :
// myClockName_clk and myClockName_reset
val myClockDomain = ClockDomain.external("myClockName")
val myArea = new ClockingArea(myClockDomain) {
val myReg = Reg(UInt(4 bits)) init(7)
myReg := myReg + 1
io.result := myReg
}
}</code></pre>
<h4>4.4生成 HDL 时的信号优先级</h4>
<p>在当前版本中,复位和时钟使能信号具有不同的优先级。它们的顺序是: <code>asyncReset</code>, <code>clockEnable</code>, <code>syncReset</code> 和 <code>softReset</code>。
Please be careful that clockEnable has a higher priority than syncReset. If you do a sync reset when the clockEnable is disabled (especially at the beginning of a simulation), the gated registers will not be reset.
这是一个例子:</p>
<pre><code class="language-scala">val clockedArea = new ClockEnableArea(clockEnable) {
val reg = RegNext(io.input) init(False)
}</code></pre>
<p>它将生成 Verilog HDL 代码,例如:</p>
<pre><code class="language-scala">always @(posedge clk) begin
if(clockedArea_newClockEnable) begin
if(!resetn) begin
clockedArea_reg <= 1'b0;
end else begin
clockedArea_reg <= io_input;
end
end
end</code></pre>
<h4>4.5语境</h4>
<p>您可以通过在任何地方调用 <code>ClockDomain.current</code> 来检索您所在的时钟域。
返回的 <code>ClockDomain</code> 实例具有以下可以调用的函数:</p>
<table>
<thead>
<tr>
<th>名称</th>
<th>描述</th>
<th>返回类型</th>
</tr>
</thead>
<tbody>
<tr>
<td>frequency.getValue</td>
<td>返回时钟域的频率。<br>这是您配置域的任意值。</td>
<td>Double</td>
</tr>
<tr>
<td>hasReset</td>
<td>如果时钟域有复位信号则返回</td>
<td>Boolean</td>
</tr>
<tr>
<td>hasSoftReset</td>
<td>返回时钟域是否有软复位信号</td>
<td>Boolean</td>
</tr>
<tr>
<td>hasClockEnable</td>
<td>返回时钟域是否有时钟使能信号</td>
<td>Boolean</td>
</tr>
<tr>
<td>readClockWire</td>
<td>返回从时钟信号派生的信号</td>
<td>Bool</td>
</tr>
<tr>
<td>readResetWire</td>
<td>返回一个从复位信号派生的信号</td>
<td>Bool</td>
</tr>
<tr>
<td>readSoftResetWire</td>
<td>返回从软复位信号派生的信号</td>
<td>Bool</td>
</tr>
<tr>
<td>readClockEnableWire</td>
<td>返回从时钟使能信号派生的信号</td>
<td>Bool</td>
</tr>
<tr>
<td>isResetActive</td>
<td>当复位有效时返回 True</td>
<td>Bool</td>
</tr>
<tr>
<td>isSoftResetActive</td>
<td>当软复位有效时返回 True</td>
<td>Bool</td>
</tr>
<tr>
<td>isClockEnableActive</td>
<td>当时钟使能有效时返回 True</td>
<td>Bool</td>
</tr>
</tbody>
</table>
<p>下面包含一个示例,其中通过 UART 控制器使用频率来设置其时钟分频器:</p>
<pre><code class="language-scala">val coreClockDomain = ClockDomain(coreClock, coreReset, frequency=FixedFrequency(100e6))
val coreArea = new ClockingArea(coreClockDomain) {
val ctrl = new UartCtrl()
ctrl.io.config.clockDivider := (coreClk.frequency.getValue / 57.6e3 / 8).toInt
}</code></pre>
<h3>3.3跨时钟域设计</h3>
<p>SpinalHDL 在编译时检查是否存在不需要的/未指定的跨时钟域信号读取。如果您想读取另一个 <code>ClockDomain</code> 逻辑区发出的信号,则应给目标信号增加 <code>crossClockDomain</code> 标记,如下例所示:</p>
<pre><code class="language-scala">// _____ _____ _____
// | | (crossClockDomain) | | | |
// dataIn -->| |--------------------->| |---------->| |--> dataOut
// | FF | | FF | | FF |
// clkA -->| | clkB -->| | clkB -->| |
// rstA -->|_____| rstB -->|_____| rstB -->|_____|
// Implementation where clock and reset pins are given by components' IO
class CrossingExample extends Component {
val io = new Bundle {
val clkA = in Bool()
val rstA = in Bool()
val clkB = in Bool()
val rstB = in Bool()
val dataIn = in Bool()
val dataOut = out Bool()
}
// sample dataIn with clkA
val area_clkA = new ClockingArea(ClockDomain(io.clkA,io.rstA)) {
val reg = RegNext(io.dataIn) init(False)
}
// 2 register stages to avoid metastability issues
val area_clkB = new ClockingArea(ClockDomain(io.clkB,io.rstB)) {
val buf0 = RegNext(area_clkA.reg) init(False) addTag(crossClockDomain)
val buf1 = RegNext(buf0) init(False)
}
io.dataOut := area_clkB.buf1
}
// Alternative implementation where clock domains are given as parameters
class CrossingExample(clkA : ClockDomain,clkB : ClockDomain) extends Component {
val io = new Bundle {
val dataIn = in Bool()
val dataOut = out Bool()
}
// sample dataIn with clkA
val area_clkA = new ClockingArea(clkA) {
val reg = RegNext(io.dataIn) init(False)
}
// 2 register stages to avoid metastability issues
val area_clkB = new ClockingArea(clkB) {
val buf0 = RegNext(area_clkA.reg) init(False) addTag(crossClockDomain)
val buf1 = RegNext(buf0) init(False)
}
io.dataOut := area_clkB.buf1
}</code></pre>
<p>一般来说,可以使用2个或更多由目标时钟域驱动的触发器来防止亚稳态。 <code>spinal.lib._</code> 中提供的 <code>BufferCC(input: T, init: T = null, bufferDepth: Int = 2)</code> 函数将实例化必要的触发器(触发器的数量将取决于 <code>bufferDepth</code> 参数)来减轻这种现象。</p>
<pre><code class="language-scala">class CrossingExample(clkA : ClockDomain,clkB : ClockDomain) extends Component {
val io = new Bundle {
val dataIn = in Bool()
val dataOut = out Bool()
}
// sample dataIn with clkA
val area_clkA = new ClockingArea(clkA) {
val reg = RegNext(io.dataIn) init(False)
}
// BufferCC to avoid metastability issues
val area_clkB = new ClockingArea(clkB) {
val buf1 = BufferCC(area_clkA.reg, False)
}
io.dataOut := area_clkB.buf1
}</code></pre>
<p><strong>警告</strong>
<code>BufferCC</code> 函数仅适用于 <code>Bit</code> 类型的信号,或作为格雷编码计数器运行的 <code>Bits</code> 信号(每个时钟周期仅翻转 1 位),并且不能用于多位跨时钟域信号。对于多位情况,建议使用 <code>StreamFifoCC</code> 来满足高带宽要求,或者在带宽要求不高的情况下使用 <code>StreamCCByToggle</code> 来减少资源使用。</p>
<h3>3.4特殊计时逻辑区</h3>
<h4>4.1慢时钟逻辑区**</h4>
<p><code>SlowArea</code> 用于创建一个逻辑区,使用比当前时钟域慢的新时钟域:</p>
<pre><code class="language-scala">class TopLevel extends Component {
// Use the current clock domain : 100MHz
val areaStd = new Area {
val counter = out(CounterFreeRun(16).value)
}
// Slow the current clockDomain by 4 : 25 MHz
val areaDiv4 = new SlowArea(4) {
val counter = out(CounterFreeRun(16).value)
}
// Slow the current clockDomain to 50MHz
val area50Mhz = new SlowArea(50 MHz) {
val counter = out(CounterFreeRun(16).value)
}
}
def main(args: Array[String]) {
new SpinalConfig(
defaultClockDomainFrequency = FixedFrequency(100 MHz)
).generateVhdl(new TopLevel)
}</code></pre>
<p><strong>警告</strong>
SlowArea 中使用的时钟信号与父区域相同。而 SlowArea 会添加一个时钟启用信号,以减慢其内部的采样率。换句话说,<code>ClockDomain.current.readClockWire</code> 将返回快速(父域)时钟。要获取时钟使能信号,请使用 <code>ClockDomain.current.readClockEnableWire</code></p>
<h4>4.2启动复位</h4>
<p>clockDomain.withBootReset() 可以指定寄存器的resetKind为BOOT。 clockDomain.withSyncReset() 可以指定寄存器的resetKind为SYNC(同步复位)。</p>
<pre><code class="language-scala">class Top extends Component {
val io = new Bundle {
val data = in Bits(8 bit)
val a, b, c, d = out Bits(8 bit)
}
io.a := RegNext(io.data) init 0
io.b := clockDomain.withBootReset() on RegNext(io.data) init 0
io.c := clockDomain.withSyncReset() on RegNext(io.data) init 0
io.d := clockDomain.withAsyncReset() on RegNext(io.data) init 0
}
SpinalVerilog(new Top)</code></pre>
<h4>4.3复位时钟域</h4>
<p><code>ResetArea</code> 用于创建一个新的时钟域区域,其使用指定的复位信号与当前时钟域复位相结合进行复位·:</p>
<pre><code class="language-scala">class TopLevel extends Component {
val specialReset = Bool()
// The reset of this area is done with the specialReset signal
val areaRst_1 = new ResetArea(specialReset, false) {
val counter = out(CounterFreeRun(16).value)
}
// The reset of this area is a combination between the current reset and the specialReset
val areaRst_2 = new ResetArea(specialReset, true) {
val counter = out(CounterFreeRun(16).value)
}
}</code></pre>
<h4>4.4时钟使能逻辑区</h4>
<p><code>ClockEnableArea</code> 用于在当前时钟域中添加额外的时钟使能信号:</p>
<pre><code class="language-scala">class TopLevel extends Component {
val clockEnable = Bool()
// Add a clock enable for this area
val area_1 = new ClockEnableArea(clockEnable) {
val counter = out(CounterFreeRun(16).value)
}
}</code></pre>
<h2>2.5实例化 VHDL 和 Verilog IP***</h2>
<h3>3.1描述</h3>
<p>黑盒允许用户通过指定其接口将现有的 VHDL/Verilog 组件集成到设计中。正确地进行实力细化取决于仿真器或综合器。</p>
<h3>3.2定义一个黑盒</h3>
<p>下面示例显示了定义黑盒的方法:</p>
<pre><code class="language-scala">// Define a Ram as a BlackBox
class Ram_1w_1r(wordWidth: Int, wordCount: Int) extends BlackBox {
// Add VHDL Generics / Verilog parameters to the blackbox
// You can use String, Int, Double, Boolean, and all SpinalHDL base
// types as generic values
addGeneric("wordCount", wordCount)
addGeneric("wordWidth", wordWidth)
// Define IO of the VHDL entity / Verilog module
val io = new Bundle {
val clk = in Bool()
val wr = new Bundle {
val en = in Bool()
val addr = in UInt (log2Up(wordCount) bits)
val data = in Bits (wordWidth bits)
}
val rd = new Bundle {
val en = in Bool()
val addr = in UInt (log2Up(wordCount) bits)
val data = out Bits (wordWidth bits)
}
}
// Map the current clock domain to the io.clk pin
mapClockDomain(clock=io.clk)
}</code></pre>
<p>在 VHDL 中, <code>Bool</code> 类型的信号将被转换为 <code>std_logic</code> , <code>Bits</code> 将被转换为 <code>std_logic_vector</code>。如果你想获得 <code>std_ulogic</code>,你必须使用 <code>BlackBoxULogic</code> 而不是 <code>BlackBox</code>。</p>
<p>在 Verilog 中,<code>BlackBoxUlogic</code> 不会更改生成的 Verilog。</p>
<h3>3.3泛型</h3>
<p>有两种不同的方式来声明泛型:</p>
<pre><code class="language-scala">class Ram(wordWidth: Int, wordCount: Int) extends BlackBox {
addGeneric("wordCount", wordCount)
addGeneric("wordWidth", wordWidth)
// OR
val generic = new Generic {
val wordCount = Ram.this.wordCount
val wordWidth = Ram.this.wordWidth
}
}</code></pre>
<h3>3.4实例化黑盒</h3>
<p>实例化一个 <code>BlackBox</code> 就像实例化一个 <code>Component</code> 一样:</p>
<pre><code class="language-scala">// Create the top level and instantiate the Ram
class TopLevel extends Component {
val io = new Bundle {
val wr = new Bundle {
val en = in Bool()
val addr = in UInt (log2Up(16) bits)
val data = in Bits (8 bits)
}
val rd = new Bundle {
val en = in Bool()
val addr = in UInt (log2Up(16) bits)
val data = out Bits (8 bits)
}
}
// Instantiate the blackbox
val ram = new Ram_1w_1r(8,16)
// Connect all the signals
io.wr.en <> ram.io.wr.en
io.wr.addr <> ram.io.wr.addr
io.wr.data <> ram.io.wr.data
io.rd.en <> ram.io.rd.en
io.rd.addr <> ram.io.rd.addr
io.rd.data <> ram.io.rd.data
}
object Main {
def main(args: Array[String]): Unit = {
SpinalVhdl(new TopLevel)
}
}</code></pre>
<h3>3.5时钟和复位信号的映射</h3>
<p>In your blackbox definition you have to explicitly define clock and reset signals. To map signals of a <code>ClockDomain</code> to corresponding inputs of the blackbox you can use the <code>mapClockDomain</code> or <code>mapCurrentClockDomain</code> function. <code>mapClockDomain</code> has the following parameters:</p>
<table>
<thead>
<tr>
<th>名称</th>
<th>类型</th>
<th>缺省值</th>
<th>描述</th>
</tr>
</thead>
<tbody>
<tr>
<td>clockDomain</td>
<td>ClockDomain</td>
<td>ClockDomain.current</td>
<td>指定提供信号的clockDomain</td>
</tr>
<tr>
<td>clock</td>
<td>Bool</td>
<td>Nothing</td>
<td>应连接到clockDomain时钟的黑盒输入</td>
</tr>
<tr>
<td>reset</td>
<td>Bool</td>
<td>Nothing</td>
<td>黑盒输入应连接到时钟域的复位信号</td>
</tr>
<tr>
<td>enable</td>
<td>Bool</td>
<td>Nothing</td>
<td>黑盒输入应连接到时钟域的使能信号</td>
</tr>
</tbody>
</table>
<p><code>mapCurrentClockDomain</code> 具有与 <code>mapClockDomain</code> 几乎相同的参数,但没有时钟域。
例如:</p>
<pre><code class="language-scala">class MyRam(clkDomain: ClockDomain) extends BlackBox {
val io = new Bundle {
val clkA = in Bool()
...
val clkB = in Bool()
...
}
// Clock A is map on a specific clock Domain
mapClockDomain(clkDomain, io.clkA)
// Clock B is map on the current clock domain
mapCurrentClockDomain(io.clkB)
}</code></pre>
<p>默认情况下,黑盒模块的端口是不绑定时钟域的,这意味着在使用这些端口时不会进行时钟交叉检查。您可以使用 ClockDomainTag 指定端口的时钟域:</p>
<pre><code class="language-scala">class DemoBlackbox extends BlackBox {
val io = new Bundle {
val clk, rst = in Bool()
val a = in Bool()
val b = out Bool()
}
mapCurrentClockDomain(io.clk, io.rst)
ClockDomainTag(this.clockDomain)(
io.a,
io.b
)
}</code></pre>
<p>您也可以将标记应用于整个线束:</p>
<pre><code class="language-scala">val io = new Bundle {
val clk, rst = in Bool()
val a = in Bool()
val b = out Bool()
}
ClockDomainTag(this.clockDomain)(io)</code></pre>
<p>从SpinalHDL 1.10.2开始,您还可以将当前时钟域应用到所有端口:</p>
<pre><code class="language-scala">val io = new Bundle {
val clk, rst = in Bool()
val a = in Bool()
val b = out Bool()
}
setIoCd()</code></pre>
<h3>3.6io前缀</h3>
<p>为了避免黑盒的每个 IO 上都有前缀 “io_” ,可以使用函数 <code>noIoPrefix()</code> ,如下所示:</p>
<pre><code class="language-scala">// Define the Ram as a BlackBox
class Ram_1w_1r(wordWidth: Int, wordCount: Int) extends BlackBox {
val generic = new Generic {
val wordCount = Ram_1w_1r.this.wordCount
val wordWidth = Ram_1w_1r.this.wordWidth
}
val io = new Bundle {
val clk = in Bool()
val wr = new Bundle {
val en = in Bool()
val addr = in UInt (log2Up(_wordCount) bits)
val data = in Bits (_wordWidth bits)
}
val rd = new Bundle {
val en = in Bool()
val addr = in UInt (log2Up(_wordCount) bits)
val data = out Bits (_wordWidth bits)
}
}
noIoPrefix()
mapCurrentClockDomain(clock=io.clk)
}</code></pre>
<h3>3.7重命名黑盒中的所有io</h3>
<p><code>BlackBox</code> 或 <code>Component</code> 的 IO 可以在编译时使用 <code>addPrePopTask</code> 函数重命名。此函数在编译期间调用一个无参数函数,对于添加重命名通道非常有用,如下所示:</p>
<pre><code class="language-scala">class MyRam() extends Blackbox {
val io = new Bundle {
val clk = in Bool()
val portA = new Bundle {
val cs = in Bool()
val rwn = in Bool()
val dIn = in Bits(32 bits)
val dOut = out Bits(32 bits)
}
val portB = new Bundle {
val cs = in Bool()
val rwn = in Bool()
val dIn = in Bits(32 bits)
val dOut = out Bits(32 bits)
}
}
// Map the clk
mapCurrentClockDomain(io.clk)
// Remove io_ prefix
noIoPrefix()
// Function used to rename all signals of the blackbox
private def renameIO(): Unit = {
io.flatten.foreach(bt => {
if(bt.getName().contains("portA")) bt.setName(bt.getName().replace("portA_", "") + "_A")
if(bt.getName().contains("portB")) bt.setName(bt.getName().replace("portB_", "") + "_B")
})
}
// Execute the function renameIO after the creation of the component
addPrePopTask(() => renameIO())
}
// This code generate these names:
// clk
// cs_A, rwn_A, dIn_A, dOut_A
// cs_B, rwn_B, dIn_B, dOut_B</code></pre>
<h3>3.8添加 RTL 源</h3>
<p>使用函数 <code>addRTLPath()</code> ,您可以将 RTL 源与黑盒关联起来。生成 SpinalHDL 代码后,您可以调用函数 <code>mergeRTLSource</code> 将所有源合并在一起。</p>
<pre><code class="language-scala">class MyBlackBox() extends Blackbox {
val io = new Bundle {
val clk = in Bool()
val start = in Bool()
val dIn = in Bits(32 bits)
val dOut = out Bits(32 bits)
val ready = out Bool()
}
// Map the clk
mapCurrentClockDomain(io.clk)
// Remove io_ prefix
noIoPrefix()
// Add all rtl dependencies
addRTLPath("./rtl/RegisterBank.v") // Add a verilog file
addRTLPath(s"./rtl/myDesign.vhd") // Add a vhdl file
addRTLPath(s"${sys.env("MY_PROJECT")}/myTopLevel.vhd") // Use an environment variable MY_PROJECT (System.getenv("MY_PROJECT"))
}
...
class TopLevel() extends Component {
// ...
val bb = new MyBlackBox()
// ...
}
val report = SpinalVhdl(new TopLevel)
report.mergeRTLSource("mergeRTL") // Merge all rtl sources into mergeRTL.vhd and mergeRTL.v files</code></pre>
<h3>3.9VHDL - 无数值类型</h3>
<p>如果您只想在黑盒组件中使用 <code>std_logic_vector</code> ,则可以将标签 <code>noNumericType</code> 添加到黑盒中。</p>
<pre><code class="language-scala">class MyBlackBox() extends BlackBox {
val io = new Bundle {
val clk = in Bool()
val increment = in Bool()
val initValue = in UInt(8 bits)
val counter = out UInt(8 bits)
}
mapCurrentClockDomain(io.clk)
noIoPrefix()
addTag(noNumericType) // Only std_logic_vector
}</code></pre>
<p>上面的代码将生成以下 VHDL:</p>
<pre><code class="language-vhdl">component MyBlackBox is
port(
clk : in std_logic;
increment : in std_logic;
initValue : in std_logic_vector(7 downto 0);
counter : out std_logic_vector(7 downto 0)
);
end component;</code></pre>
<h2>2.6保留名称的方法</h2>
<p>本页将描述 SpinalHDL 如何将名称从 scala 代码传播到生成的硬件 RTL。您应该了解它们,从而尽可能保留这些名称,以生成可理解的网表。</p>
<h3>3.1Nameable 基类</h3>
<p>所有可以在 SpinalHDL 中命名的事物都扩展了 Nameable 基类。</p>
<ul>
<li>Component</li>
<li>Area</li>
<li>Data (UInt, SInt, Bundle, …)
有一些 Nameable 类型 API 的示例
<pre><code class="language-scala">class MyComponent extends Component {
val a, b, c, d = Bool()
b.setName("rawrr") // Force name
c.setName("rawrr", weak = true) // Propose a name, will not be applied if a stronger name is already applied
d.setCompositeName(b, postfix = "wuff") // Force toto to be named as b.getName() + _wuff"
}</code></pre>
<p>会生成:</p>
<pre><code class="language-verilog">module MyComponent (
);
wire a;
wire rawrr;
wire c;
wire rawrr_wuff;
endmodule</code></pre>
<p>In general, you don’t really need to access that API, unless you want to do tricky stuff for debug reasons or for elaboration purposes.</p>
<h3>3.2从 Scala 中提取名称</h3>
<p>首先,从 1.4.0 版本开始,SpinalHDL 使用 scala 编译器插件,该插件可以在类构造期间在每次定义新 val 时,实现函数回调。
这个示例或多或少地展示了 SpinalHDL 本身是如何实现的:</p>
<pre><code class="language-scala">
// spinal.idslplugin.ValCallback is the Scala compiler plugin feature which will provide the callbacks
class Component extends spinal.idslplugin.ValCallback {
override def valCallback[T](ref: T, name: String) : T = {
println(s"Got $ref named $name") // Here we just print what we got as a demo.
ref
}
}</code></pre></li>
</ul>
<p>class UInt
class Bits
class MyComponent extends Component {
val two = 2
val wuff = "miaou"
val toto = new UInt
val rawrr = new Bits
}</p>
<p>object Debug3 extends App {
new MyComponent()
// ^ This will print :
// Got 2 named two
// Got miaou named wuff
// Got spinal.tester.code.sandbox.UInt@691a7f8f named toto
// Got spinal.tester.code.sandbox.Bits@161b062a named rawrr
}</p>
<pre><code>使用 ValCallback“自省”功能,SpinalHDL 的组件类能够了解其内容和内容的名称。
但这也意味着,如果您希望某些东西获得名称,并且仅依赖于此自动命名功能,则对 Data (UInt、SInt、…) 实例的引用应存储在组件的某个 val 对象定义中。
例如 :
```scala
class MyComponent extends Component {
val a,b = in UInt(8 bits) // Will be properly named
val toto = out UInt(8 bits) // same
def doStuff(): Unit = {
val tmp = UInt(8 bits) // This will not be named, as it isn't stored anywhere in a
// component val (but there is a solution explained later)
tmp := 0x20
toto := tmp
}
doStuff()
}将生成:
module MyComponent (
  input      [7:0]    a,
  input      [7:0]    b,
  output     [7:0]    toto
);
  // Note that the tmp signal defined in scala was "shortcuted" by SpinalHDL,
  //  as it was unnamed and technically "shortcutable"
  assign toto = 8'h20;
endmodule
3.3组件中的区域
命名系统的一个重要方面是您可以在组件内定义新的名称空间并进行操作
例如通过 Area :
class MyComponent extends Component {
  val logicA = new Area {    // This define a new namespace named "logicA
    val toggle = Reg(Bool()) // This register will be named "logicA_toggle"
    toggle := !toggle
  }
}
会生成
module MyComponent (
  input               clk,
  input               reset
);
  reg                 logicA_toggle;
  always @ (posedge clk) begin
    logicA_toggle <= (! logicA_toggle);
  end
endmodule
3.4函数中的逻辑区
您还可以定义将创建新逻辑区的函数,该逻辑区将为其所有内容提供命名空间:
class MyComponent extends Component {
  def isZero(value: UInt) = new Area {
    val comparator = value === 0
  }

  val value = in UInt (8 bits)
  val someLogic = isZero(value)

  val result = out Bool()
  result := someLogic.comparator
}
这将生成:
module MyComponent (
  input      [7:0]    value,
  output              result
);
  wire                someLogic_comparator;

  assign someLogic_comparator = (value == 8'h0);
  assign result = someLogic_comparator;

endmodule
3.5函数中的复合区(Composite)
SpinalHDL 1.5.0 中添加了复合区,它允许您创建一个范围,该范围将用作另一个 Nameable 的前缀:
class MyComponent extends Component {
  // Basically, a Composite is an Area that use its construction parameter as namespace prefix
  def isZero(value: UInt) = new Composite(value) {
    val comparator = value === 0
  }.comparator  // Note we don't return the Composite,
                //  but the element of the composite that we are interested in

  val value = in UInt (8 bits)
  val result = out Bool()
  result := isZero(value)
}
将生成:
module MyComponent (
  input      [7:0]    value,
  output              result
);
  wire                value_comparator;

  assign value_comparator = (value == 8'h0);
  assign result = value_comparator;

endmodule
3.6复合区级联链
您还可以级联复合区:
class MyComponent extends Component {
  def isZero(value: UInt) = new Composite(value) {
    val comparator = value === 0
  }.comparator

  def inverted(value: Bool) = new Composite(value) {
    val inverter = !value
  }.inverter

  val value = in UInt(8 bits)
  val result = out Bool()
  result := inverted(isZero(value))
}
将生成:
module MyComponent (
  input      [7:0]    value,
  output              result
);
  wire                value_comparator;
  wire                value_comparator_inverter;

  assign value_comparator = (value == 8'h0);
  assign value_comparator_inverter = (! value_comparator);
  assign result = value_comparator_inverter;

endmodule
3.7在一个线束(Bundle)的函数中的复合区
This behavior can be very useful when implementing Bundle utilities. For instance in the spinal.lib.Stream class is defined the following :
class Stream[T <: Data](val payloadType :  HardType[T]) extends Bundle {
  val valid   = Bool()
  val ready   = Bool()
  val payload = payloadType()

  def queue(size: Int): Stream[T] = new Composite(this) {
    val fifo = new StreamFifo(payloadType, size)
    fifo.io.push << self    // 'self' refers to the Composite construction argument ('this' in
                            //  the example). It avoids having to do a boring 'Stream.this'
  }.fifo.io.pop

  def m2sPipe(): Stream[T] = new Composite(this) {
    val m2sPipe = Stream(payloadType)

    val rValid = RegInit(False)
    val rData = Reg(payloadType)

    self.ready := (!m2sPipe.valid) || m2sPipe.ready

    when(self.ready) {
      rValid := self.valid
      rData := self.payload
    }

    m2sPipe.valid := rValid
    m2sPipe.payload := rData
  }.m2sPipe
}
这将允许嵌套调用,同时保留名称:
class MyComponent extends Component {
  val source = slave(Stream(UInt(8 bits)))
  val sink = master(Stream(UInt(8 bits)))
  sink << source.queue(size = 16).m2sPipe()
}
会生成
module MyComponent (
  input               source_valid,
  output              source_ready,
  input      [7:0]    source_payload,
  output              sink_valid,
  input               sink_ready,
  output     [7:0]    sink_payload,
  input               clk,
  input               reset
);
  wire                source_fifo_io_pop_ready;
  wire                source_fifo_io_push_ready;
  wire                source_fifo_io_pop_valid;
  wire       [7:0]    source_fifo_io_pop_payload;
  wire       [4:0]    source_fifo_io_occupancy;
  wire       [4:0]    source_fifo_io_availability;
  wire                source_fifo_io_pop_m2sPipe_valid;
  wire                source_fifo_io_pop_m2sPipe_ready;
  wire       [7:0]    source_fifo_io_pop_m2sPipe_payload;
  reg                 source_fifo_io_pop_rValid;
  reg        [7:0]    source_fifo_io_pop_rData;

  StreamFifo source_fifo (
    .io_push_valid      (source_valid                 ), //i
    .io_push_ready      (source_fifo_io_push_ready    ), //o
    .io_push_payload    (source_payload               ), //i
    .io_pop_valid       (source_fifo_io_pop_valid     ), //o
    .io_pop_ready       (source_fifo_io_pop_ready     ), //i
    .io_pop_payload     (source_fifo_io_pop_payload   ), //o
    .io_flush           (1'b0                         ), //i
    .io_occupancy       (source_fifo_io_occupancy     ), //o
    .io_availability    (source_fifo_io_availability  ), //o
    .clk                (clk                          ), //i
    .reset              (reset                        )  //i
  );
  assign source_ready = source_fifo_io_push_ready;
  assign source_fifo_io_pop_ready = ((1'b1 && (! source_fifo_io_pop_m2sPipe_valid)) || source_fifo_io_pop_m2sPipe_ready);
  assign source_fifo_io_pop_m2sPipe_valid = source_fifo_io_pop_rValid;
  assign source_fifo_io_pop_m2sPipe_payload = source_fifo_io_pop_rData;
  assign sink_valid = source_fifo_io_pop_m2sPipe_valid;
  assign source_fifo_io_pop_m2sPipe_ready = sink_ready;
  assign sink_payload = source_fifo_io_pop_m2sPipe_payload;
  always @ (posedge clk or posedge reset) begin
    if (reset) begin
      source_fifo_io_pop_rValid <= 1'b0;
    end else begin
      if(source_fifo_io_pop_ready)begin
        source_fifo_io_pop_rValid <= source_fifo_io_pop_valid;
      end
    end
  end

  always @ (posedge clk) begin
    if(source_fifo_io_pop_ready)begin
      source_fifo_io_pop_rData <= source_fifo_io_pop_payload;
    end
  end
endmodule
1.3语义**
2.1赋值*
有多个赋值运算符:
| 符号 | 描述 |
|---|---|
:= |
标准赋值,相当于 VHDL/Verilog 中的 |
= |
相当于 VHDL 中的 := 和 Verilog 中的 =。该值会立即就地更新。仅适用于组合信号,不适用于寄存器。 |
<> |
2 个信号或相同类型的两个信号线束之间的自动连接。通过使用信号定义(输入/输出)来推断方向。 (与 :=类似的行为) |
When muxing (for instance using when, see When/Switch/Mux.), the last valid standard assignment := wins. Else, assigning twice to the same assignee from the same scope results in an assignment overlap. SpinalHDL will assume this is a unintentional design error by default and halt elaboration with error. For special use-cases assignment overlap can be programmatically permitted on a case by case basis. (see 赋值覆盖(Assignment overlap)).
val a, b, c = UInt(4 bits)
a := 0
b := a
// a := 1 // this would cause an assignment overlap error,
          // if manually overridden the assignment would take assignment priority
c := a

var x = UInt(4 bits)
val y, z = UInt(4 bits)
x := 0
y := x      // y read x with the value 0
x = x + 1
z := x      // z read x with the value 1

// Automatic connection between two UART interfaces.
uartCtrl.io.uart <> io.uart
它还支持线束赋值(将所有位信号转换为适当位宽的 Bits 类型的单位总线,然后在赋值表达式中使用更宽的形式)。在赋值表达式的左侧和右侧使用 () (Scala 元组语法)将多个信号捆绑在一起。
val a, b, c = UInt(4 bits)
val d       = UInt(12 bits)
val e       = Bits(10 bits)
val f       = SInt(2  bits)
val g       = Bits()

(a, b, c) := B(0, 12 bits)
(a, b, c) := d.asBits
(a, b, c) := (e, f).asBits           // both sides
g         := (a, b, c, e, f).asBits  // and on the right hand side
重要的是要理解,在 SpinalHDL 中,信号的性质(组合/时序)是在其声明中定义的,而不是通过赋值的方式定义的。所有数据类型实例都将定义一个组合信号,而用 Reg(...) 包装的实例将定义为一个时序信号(寄存器)。
val a = UInt(4 bits)              // Define a combinational signal
val b = Reg(UInt(4 bits))         // Define a registered signal
val c = Reg(UInt(4 bits)) init(0) // Define a registered signal which is
                                  //  set to 0 when a reset occurs
3.1位宽检查
SpinalHDL 检查赋值左侧和右侧的位数是否匹配。有多种方法可以改变给定 BitVector (Bits, UInt, SInt)的位宽:
| 调整位宽的技术 | 描述 |
|---|---|
| x := y.resized | 将 y 改变位宽后的副本分配给 x,其位宽是从 x 推断出来的。 |
| x := y.resize(newWidth) | 为 x 赋值一个 y 变为 newWidth 位宽后的副本。 |
| x := y.resizeLeft(newWidth) | 对 x 赋值 y 变为 newWidth 位宽后的副本。如果需要,可在 LSB 处进行填充。 |
所有改变位宽方法都可能导致生成的位宽比 y 的原始位宽更宽或更窄。当发生加宽时,额外的位将用零填充。
x.resized 根据赋值表达式左侧的目标位宽推断转换方法,并遵循与 y.resize(someWidth) 相同的语义。表达式 x := y.resized 相当于 x := y.resize(x.getBitsWidth bits)。
虽然示例代码片段显示了赋值语句的使用方法,但 resize 系列方法可以像任何普通 Scala 方法一样进行级联。
在一种情况下,Spinal 会自动调整位宽的大小:
// U(3) creates an UInt of 2 bits, which doesn't match the left side (8 bits)
myUIntOf_8bits := U(3)
因为 U(3) 是一个“弱”位计数推断信号,SpinalHDL 会自动加宽它。这可以被认为在功能上等同于 U(3, 2 bits).resized ,但是请放心,如果场景需要缩小范围,SpinalHDL 将做正确的事情并报告错误。当尝试赋值 myUIntOf_8bits时,如果字面量需要 9 位(例如 U(0x100)),则会报告错误。
3.2组合逻辑环(Combinatorial loops)
SpinalHDL 检查您的设计中是否存在组合逻辑环(锁存器)。如果检测到,会引发错误,并且 SpinalHDL 将打印造成循环的路径。
3.3CombInit*
CombInit 可用于复制信号及其当前的组合逻辑赋值。主要用例是能够稍后覆盖复制后信号,而不影响原始信号。
val a = UInt(8 bits)
a := 1

val b = a
when(sel) {
    b := 2
    // At this point, a and b are evaluated to 2: they reference the same signal
}

val c = UInt(8 bits)
c := 1

val d = CombInit(c)
// Here c and d are evaluated to 1
when(sel) {
    d := 2
    // At this point c === 1 and d === 2.
}
If we look at the resulting Verilog, b is not present. Since it is a copy of a by reference, these variables designate the same Verilog wire.
CombInit 在辅助函数中特别有用,可确保返回值不引用输入。
// note that condition is an elaboration time constant
def invertedIf(b: Bits, condition: Boolean): Bits = if(condition) { ~b } else { CombInit(b) }

val a2 = invertedIf(a1, c)

when(sel) {
   a2 := 0
}
Without CombInit, if c == false (but not if c == true), a1 and a2 reference the same signal and the zero assignment is also applied to a1. With CombInit we have a coherent behavior whatever the c value.
2.2When/Switch/Mux **
3.1When
与 VHDL 和 Verilog 中一样,当满足指定条件时可以有条件地赋值信号:
when(cond1) {
  // Execute when cond1 is true
} elsewhen(cond2) {
  // Execute when (not cond1) and cond2
} otherwise {
  // Execute when (not cond1) and (not cond2)
}
警告
如果关键字 otherwise 与 when 条件的右括号 } 在同一行,则不需要点。
但如果 .otherwise 在另一行,则需要一个点:
when(cond1) {
    // Execute when cond1 is true
}
.otherwise {
    // Execute when (not cond1) and (not cond2)
}
3.2WhenBuilder
Sometimes we need to generate some parameters for the when condition, and the original structure of when/otherwise is not very suitable. Therefore, we provide a ‘whenBuilder’ method to achieve this goal:
import spinal.lib._

val conds = Bits(8 bits)
val result = UInt(8 bits)

val ctx = WhenBuilder()
ctx.when(conds(0)) {
  result := 0
}
ctx.when(conds(1)) {
  result := 1
}
if(true) {
  ctx.when(conds(2)) {
    result := 2
  }
}
ctx.when(conds(3)) {
  result := 3
}
Compared to the when/elsewhen/otherwise approach, it might be more convenient for parameterization. we can also use like this:
for(i <- 5 to 7) ctx.when(conds(i)) {
  result := i
}

ctx.otherwise {
  result := 255
}

switch(addr) {
  for (i <- addressElements ) {
    is(i) {
      rdata :=  buffer(i)
    }
  }
}
这样,我们可以像在 switch() 中使用 foreach 一样,对优先级电路进行参数化,并以更直观的if-else格式生成代码。
3.3Switch
与 VHDL 和 Verilog 中一样,当信号具有定义的值时,可以有条件地对信号赋值:
switch(x) {
  is(value1) {
    // Execute when x === value1
  }
  is(value2) {
    // Execute when x === value2
  }
  default {
    // Execute if none of precedent conditions met
  }
}
is 子句可以通过用逗号 is(value1, value2) 分隔来进行分解(逻辑 OR)。
4.1示例
switch(aluop) {
  is(ALUOp.add) {
    immediate := instruction.immI.signExtend
  }
  is(ALUOp.slt) {
    immediate := instruction.immI.signExtend
  }
  is(ALUOp.sltu) {
    immediate := instruction.immI.signExtend
  }
  is(ALUOp.sll) {
    immediate := instruction.shamt
  }
  is(ALUOp.sra) {
    immediate := instruction.shamt
  }
}
相当于
switch(aluop) {
  is(ALUOp.add, ALUOp.slt, ALUOp.sltu) {
      immediate := instruction.immI.signExtend
  }
  is(ALUOp.sll, ALUOp.sra) {
      immediate := instruction.shamt
  }
}
4.2其他选项
默认情况下,如果 switch 包含 default 语句,而 switch 的所有可能的逻辑值都已被是 is 语句“覆盖”,SpinalHDL 将生成“UNREACHABLE DEFAULT STATEMENT”错误。您可以通过指定 switch(myValue, coverUnreachable = true) { … }
switch(my2Bits, coverUnreachable = true) {
    is(0) { ... }
    is(1) { ... }
    is(2) { ... }
    is(3) { ... }
    default { ... } // This will parse and validate without error now
}
备注
此检查是针对逻辑值而不是物理值进行的。例如,如果您有一个以独热编码的 SpinalEnum(A,B,C),SpinalHDL 将只关心 A,B,C 值 (“001” “010” “100”)。物理值“000”“011”“101”“110”“111”将不被考虑。
默认情况下,如果给定的 is 语句多次提供相同的值,SpinalHDL 将生成 “DUPLICATED ELEMENTS IN SWITCH IS(…) STATEMENT” 错误。例如 is(42,42) { ... } 您可以通过指定 switch(myValue, strict = true){ ... } 来避免报告此错误。 SpinalHDL 然后将负责删除重复的值。
switch(value, strict = false) {
    is(0) { ... }
    is(1,1,1,1,1) { ... } // This will be okay
    is(2) { ... }
}
3.4本地声明
可以在 when/switch 语句中定义新信号:
val x, y = UInt(4 bits)
val a, b = UInt(4 bits)

when(cond) {
  val tmp = a + b
  x := tmp
  y := tmp + 1
} otherwise {
  x := 0
  y := 0
}
备注
SpinalHDL 会检查范围内定义的信号是否仅在该范围内使用/赋值。
3.5Mux
如果您只需要一个带有 Bool 选择信号的 Mux ,则有两种等效的语法:
| 语法 | 返回类型 | 描述 |
|---|---|---|
| Mux(cond, whenTrue, whenFalse) | T | 当 cond 为 True 时返回 whenTrue ,否则返回 whenFalse |
| cond ? whenTrue | whenFalse | T | 当 cond 为 True 时返回 whenTrue ,否则返回 whenFalse |
val cond = Bool()
val whenTrue, whenFalse = UInt(8 bits)
val muxOutput  = Mux(cond, whenTrue, whenFalse)
val muxOutput2 = cond ? whenTrue | whenFalse
3.6按位选择
val bitwiseSelect = UInt(2 bits)
val bitwiseResult = bitwiseSelect.mux(
  0 -> (io.src0 & io.src1),
  1 -> (io.src0 | io.src1),
  2 -> (io.src0 ^ io.src1),
  default -> (io.src0)
)
mux 检查所有可能的值是否都被覆盖以防止锁存器的生成。如果覆盖了所有可能的值,则不允许添加default语句:
val bitwiseSelect = UInt(2 bits)
val bitwiseResult = bitwiseSelect.mux(
  0 -> (io.src0 & io.src1),
  1 -> (io.src0 | io.src1),
  2 -> (io.src0 ^ io.src1),
  3 -> (io.src0)
)
muxList(...) 和 muxListDc(...) 是另一种按位选择器,它们采用元组或映射作为输入。
muxList 可以用作 mux 的直接替代品,在生成案例的代码中提供更易于使用的接口。它具有与 mux 相同的检查行为,它要求完全覆盖并禁止在不需要时列出默认值。
如果未覆盖的值不重要,则可以使用 muxtListDc ,可以使用 muxtListDc 将它们保留为未分配状态。如果需要,这将添加默认情况。如果遇到这种默认情况,将在仿真过程中生成 X。muxListDc(...) 通常是一个很好的通用代码的替代方法。
下面是将 128 位的 Bits 划分为 32 位的示例:
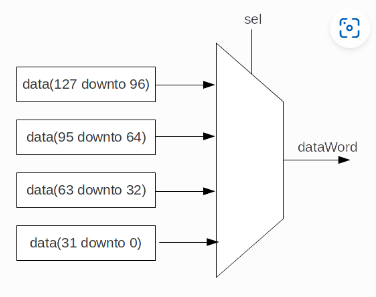
val sel  = UInt(2 bits)
val data = Bits(128 bits)

// Dividing a wide Bits type into smaller chunks, using a mux:
val dataWord = sel.muxList(for (index <- 0 until 4)
                           yield (index, data(index*32+32-1 downto index*32)))

// A shorter way to do the same thing:
val dataWord = data.subdivideIn(32 bits)(sel)
下面是 muxListDc 的案例,从可配置位宽的向量中选择多个位:
case class Example(width: Int = 3) extends Component {
  // 2 bit wide for default width
  val sel = UInt(log2Up(count) bit)
  val data = Bits(width*8 bit)
  // no need to cover missing case 3 for default width
  val dataByte = sel.muxListDc(for(i <- 0 until count) yield (i, data(index*8, 8 bit)))
}
1.4时序逻辑
2.1寄存器
在 SpinalHDL 中创建寄存器与在 VHDL 或 Verilog 中创建寄存器有很大不同。
在 Spinal 中,没有 process/always 块。寄存器在声明时明确定义。这种与传统的事件驱动 HDL 的区别具有很大的影响:
- You can assign registers and signals in the same scope, meaning the code doesn’t need to be split between process/always blocks
- 它使事情变得更加灵活(参见 Functions)
时钟和复位是分开处理的,有关详细信息,请参阅 时钟域
3.1实例化
实例化寄存器有4种方法:
| 语法 | 描述 |
|---|---|
Reg(type : Data) |
创建给定类型的寄存器 |
RegInit(resetValue : Data) |
当发生复位时,为寄存器加载给定的 resetValue |
RegNext(nextValue : Data) |
创建寄存器,且每个周期对给定的 nextValue 进行采样 |
RegNextWhen(nextValue : Data, cond : Bool) |
创建寄存器,当条件发生时对 nextValue 进行采样 |
这是声明一些寄存器的示例:
// UInt register of 4 bits
val reg1 = Reg(UInt(4 bits))

// Register that updates itself every cycle with a sample of reg1 incremented by 1
val reg2 = RegNext(reg1 + 1)

// UInt register of 4 bits initialized with 0 when the reset occurs
val reg3 = RegInit(U"0000")
reg3 := reg2
when(reg2 === 5) {
  reg3 := 0xF
}

// Register that samples reg3 when cond is True
val reg4 = RegNextWhen(reg3, cond)
上面的代码将推断出以下逻辑:
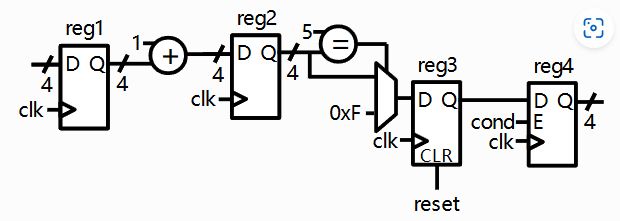
备注
上面 reg3 示例显示了如何为 RegInit 创建寄存器赋值。也可以使用相同的语法赋值其他寄存器类型(“Reg”、“RegNext”、“RegNextWhen”)。就像组合赋值一样,规则是“最后一个赋值生效”,但如果没有完成赋值,寄存器将保留其值。如果在设计中声明 Reg 并且没有适当地赋值和使用, EDA 流程中的工具会在它认为该寄存器不必要时裁剪寄存器(从设计中删除)。
另外,RegNext 是一个基于 Reg 语法构建的抽象。下面两个代码序列严格等效:
// Standard way
val something = Bool()
val value = Reg(Bool())
value := something

// Short way
val something = Bool()
val value = RegNext(something)
可以通过其他方式同时拥有多个选项,因此可在上述基本理解的基础上构建稍微更高级的组合:
// UInt register of 6 bits (initialized with 42 when the reset occurs)
val reg1 = Reg(UInt(6 bits)) init(42)

// Register that samples reg1 each cycle (initialized with 0 when the reset occurs)
// using Scala named parameter argument format
val reg2 = RegNext(reg1, init=0)

// Register that has multiple features combined

// My register enable signal
val reg3Enable = Bool()
// UInt register of 6 bits (inferred from reg1 type)
//   assignment preconfigured to update from reg1
//   only updated when reg3Enable is set
//   initialized with 99 when the reset occurs
val reg3 = RegNextWhen(reg1, reg3Enable, U(99))
// when(reg3Enable) {
//   reg3 := reg1; // this expression is implied in the constructor use case
// }

when(cond2) {      // this is a valid assignment, will take priority when executed
   reg3 := U(0)    //  (due to last assignment wins rule), assignment does not require
}                  //  reg3Enable condition, you would use when(cond2 & reg3Enable) for that

// UInt register of 8 bits, initialized with 99 when the reset occurs
val reg4 = Reg(UInt(8 bits), U(99))
// My register enable signal
val reg4Enable = Bool()
// no implied assignments exist, you must use enable explicitly as necessary
when(reg4Enable) {
   reg4 := newValue
}
3.2复位值
除了直接创建具有复位值的寄存器的 RegInit(value : Data) 语法之外,您还可以通过在寄存器上调用 init(value : Data) 函数来设置复位值。
// UInt register of 4 bits initialized with 0 when the reset occurs
val reg1 = Reg(UInt(4 bits)) init(0)
如果您有一个包含线束(Bundle)的寄存器,则可以对线束的每个元素使用 init 函数。
case class ValidRGB() extends Bundle {
  val valid   = Bool()
  val r, g, b = UInt(8 bits)
}

val reg = Reg(ValidRGB())
reg.valid init(False)  // Only the valid if that register bundle will have a reset value.
3.3用于仿真目的的初始化值
对于在 RTL 中不需要复位值,但需要仿真初始化值(以避免未知状态X传播)的寄存器,您可以通过调用 randBoot() 函数来请求随机初始化值。
// UInt register of 4 bits initialized with a random value
val reg1 = Reg(UInt(4 bits)) randBoot()
3.4寄存器组
As for signals, it is possible to define a vector of registers with Vec.
val vecReg1 = Vec(Reg(UInt(8 bits)), 4)
val vecReg2 = Vec.fill(8)(Reg(Bool()))
初始化可以像往常一样使用 init 方法完成,它可以与寄存器上的 foreach 迭代相结合。
val vecReg1 = Vec(Reg(UInt(8 bits)) init(0), 4)
val vecReg2 = Vec.fill(8)(Reg(Bool()))
vecReg2.foreach(_ init(False))
如果由于初始化值未知而必须推迟初始化,请使用如下例所示的函数。
case class ShiftRegister[T <: Data](dataType: HardType[T], depth: Int, initFunc: T => Unit) extends Component {
   val io = new Bundle {
      val input  = in (dataType())
      val output = out(dataType())
   }

   val regs = Vec.fill(depth)(Reg(dataType()))
   regs.foreach(initFunc)

   for (i <- 1 to (depth-1)) {
         regs(i) := regs(i-1)
   }

   regs(0) := io.input
   io.output := regs(depth-1)
}

object SRConsumer {
   def initIdleFlow[T <: Data](flow: Flow[T]): Unit = {
      flow.valid init(False)
   }
}

class SRConsumer() extends Component {
   // ...
   val sr = ShiftRegister(Flow(UInt(8 bits)), 4, SRConsumer.initIdleFlow[UInt])
}
3.5Transforming a signal into a register
Sometimes it is useful to transform an existing signal into a register. For instance, when you are using a Bundle, if you want some outputs of the bundle to be registers, you might prefer to write io.myBundle.PORT := newValue without declaring registers with val PORT = Reg(...) and connecting their output to the port with io.myBundle.PORT := PORT. To do this, you just need to use .setAsReg() on the ports you want to control as registers:
val io = new Bundle {
   val apb = master(Apb3(apb3Config))
}

io.apb.PADDR.setAsReg()
io.apb.PWRITE.setAsReg() init(False)

when(someCondition) {
   io.apb.PWRITE := True
}
备注
The register is created in the clock domain of the signal, and does not depend on the place where .setAsReg() is used.
In the example above, the signal is defined in the io Bundle, in the same clock domain as the component. Even if io.apb.PADDR.setAsReg() was written in a ClockingArea with a different clock domain, the register would use the clock domain of the component and not the one of the ClockingArea.
2.2存储器
要在 SpinalHDL 中创建内存,应使用 Mem 类。它允许您定义内存并向其添加读写端口。
| 语法 | 描述 |
|---|---|
Mem(type : Data, size : Int) |
创建随机访问存储器 |
Mem(type : Data, initialContent : Array[Data]) |
创建一个 ROM。如果您的目标是 FPGA,因为存储器可以推断为块 RAM,您仍然可以在其上创建写入端口。 |
备注
如果你想定义一个 ROM,initialContent 数组的元素应该只是字面量(无法做运算,无法改变位宽)。这里有一个例子 here。
备注
要给 RAM 初始值,您还可以使用 init 函数。
备注
掩码位宽是可以灵活设定的,您可以根据掩码的宽度将存储器分成位宽相同的多个片段。例如,如果您有一个32位内存字,并提供一个4位掩码,那么它将是一个字节掩码。如果您提供的掩码位数与存储器一个字的位数相同,那么它将是一个位掩码。
备注
在仿真时可以对 Mem 进行操作,请参阅 仿真中加载和存储存储器 部分。
下表显示了如何在存储器上添加访问端口:
| 语法 | 描述 | 返回类型 |
|---|---|---|
| mem(address) := data | 同步写入 | |
| mem(x) | 异步读取 | T |
| mem.write( address data [enable] [mask] ) |
使用可选掩码进行同步写入。
如果未指定使能(enable)条件,则会自动从调用此函数的条件范围(如when语句等)中推断出条件 |
|
| mem.readAsync( address [readUnderWrite] ) |
异步读取,具有可选的写入时读取(read-under-write)策略 | T |
| mem.readSync( address [enable] [readUnderWrite] [clockCrossing] ) |
同步读取,具有可选的使能信号、写入间读取策略、跨时钟域(clockCrossing)模式。 |
T |
| mem.readWriteSync( address data enable write [mask] [readUnderWrite] [clockCrossing] ) |
推断读/写端口。
当 返回读取的数据,当 |
T |
备注
如果由于某种原因您需要一个未在 Spinal 中实现的特定存储器端口,您始终可以通过为其指定 BlackBox 来抽象您的存储器。
重要
SpinalHDL 中的存储器端口不是推断的,而是明确定义的。您不应使用 VHDL/Verilog 等编码模板来帮助综合工具推断存储器。
下面是一个推断简单双端口 RAM(32 位 * 256)的示例:
val mem = Mem(Bits(32 bits), wordCount = 256)
mem.write(
  enable  = io.writeValid,
  address = io.writeAddress,
  data    = io.writeData
)

io.readData := mem.readSync(
  enable  = io.readValid,
  address = io.readAddress
)
3.1同步使能注意事项
当使能信号用于由 when 等条件块保护的块中时,只会生成用使能信号作为访问条件的电路,也就是说 when 条件将被忽略。
val rom = Mem(Bits(10 bits), 32)
when(cond) {
  io.rdata := rom.readSync(io.addr, io.rdEna)
}
上面的例子中条件 cond 就不详细说明了。最好直接在使能信号中包含条件 cond,如下所示。
io.rdata := rom.readSync(io.addr, io.rdEna & cond)3.2写入时读取策略
此策略指定在同一周期内对同一地址发生写入时,读取的值将受到怎样的影响。
| 种类 | 描述 |
|---|---|
dontCare |
发生这种情况时不用关心读取的值 |
readFirst |
读取操作将得到写入之前的值 |
writeFirst |
读取操作将得到由写入提供的值 |
重要
生成的 VHDL/Verilog 始终处于 readFirst 模式,该模式与 dontCare 兼容,但与 writeFirst 不兼容。要生成包含此类功能的设计,您需要使能 自动存储器黑盒。
3.3混合位宽存储器
您可以使用以下函数指定访问存储器的端口,其位宽为二的幂次:
| 语法 | 描述 |
|---|---|
| mem.writeMixedWidth( address data [readUnderWrite] ) |
类似于 mem.write |
| mem.readAsyncMixedWidth( address data [readUnderWrite] ) |
类似于 mem.readAsync, 会立即返回值,它驱动以 data 参数的形式传入的信号/对象 |
| mem.readSyncMixedWidth( address data [enable] [readUnderWrite] [clockCrossing] ) |
与 mem.readSync 类似,但它不是返回读取值,而是驱动 data 参数给出的信号/对象 |
| mem.readWriteSyncMixedWidth( address data enable write [mask] [readUnderWrite] [clockCrossing] ) |
相当于 mem.readWriteSync |
重要
至于写入时读取策略,要使用此功能,您需要启用 自动内存黑盒,因为没有通用的 VHDL/Verilog 语言模板来推断混合位宽存储器。
3.4自动黑盒化
由于使用常规 VHDL/Verilog 不可能推断所有 ram 类型,因此 SpinalHDL 集成了可选的自动黑盒系统。该系统会查看 RTL 网表中存在的所有存储器,并用一个黑盒替换它们。然后生成的代码将依赖第三方IP来提供内存功能,例如写入时读取策略和混合位宽端口。
这是一个如何缺省使能黑盒化存储器的例子:
def main(args: Array[String]) {
  SpinalConfig()
    .addStandardMemBlackboxing(blackboxAll)
    .generateVhdl(new TopLevel)
}
如果标准黑盒工具不足以满足您的设计需求,请毫不犹豫地创建 Github工单。还有一种方法,可以创建您自己的黑盒工具。
4.1黑盒策略
您可以使用多种策略来选择要黑盒的内存以及黑盒不可行时要执行的操作:
| 种类 | 描述 |
|---|---|
blackboxAll |
黑盒化所有存储器。 对不可黑盒存储器抛出错误 |
blackboxAllWhatsYouCan |
黑盒所有可黑盒的存储器 |
blackboxRequestedAndUninferable |
用户指定的黑盒存储器和已知不可推断的存储器(混合位宽,…)。 对不可黑盒存储器抛出错误 |
blackboxOnlyIfRequested |
用户指定的黑盒存储器 对不可黑盒存储器抛出错误 |
要显式地将存储器设置为黑盒,您可以使用其 generateAsBlackBox 函数。
val mem = Mem(Rgb(rgbConfig), 1 << 16)
mem.generateAsBlackBox()
你可以通过继承 MemBlackboxingPolicy 类定义你自己的黑盒化策略。
4.2标准存储器黑盒
下面显示的是 SpinalHDL 中使用的标准黑盒的 VHDL 定义:
-- Simple asynchronous dual port (1 write port, 1 read port)
component Ram_1w_1ra is
  generic(
    wordCount : integer;
    wordWidth : integer;
    technology : string;
    readUnderWrite : string;
    wrAddressWidth : integer;
    wrDataWidth : integer;
    wrMaskWidth : integer;
    wrMaskEnable : boolean;
    rdAddressWidth : integer;
    rdDataWidth : integer
  );
  port(
    clk : in std_logic;
    wr_en : in std_logic;
    wr_mask : in std_logic_vector;
    wr_addr : in unsigned;
    wr_data : in std_logic_vector;
    rd_addr : in unsigned;
    rd_data : out std_logic_vector
  );
end component;

-- Simple synchronous dual port (1 write port, 1 read port)
component Ram_1w_1rs is
  generic(
    wordCount : integer;
    wordWidth : integer;
    clockCrossing : boolean;
    technology : string;
    readUnderWrite : string;
    wrAddressWidth : integer;
    wrDataWidth : integer;
    wrMaskWidth : integer;
    wrMaskEnable : boolean;
    rdAddressWidth : integer;
    rdDataWidth : integer;
    rdEnEnable : boolean
  );
  port(
    wr_clk : in std_logic;
    wr_en : in std_logic;
    wr_mask : in std_logic_vector;
    wr_addr : in unsigned;
    wr_data : in std_logic_vector;
    rd_clk : in std_logic;
    rd_en : in std_logic;
    rd_addr : in unsigned;
    rd_data : out std_logic_vector
  );
end component;

-- Single port (1 readWrite port)
component Ram_1wrs is
  generic(
    wordCount : integer;
    wordWidth : integer;
    readUnderWrite : string;
    technology : string
  );
  port(
    clk : in std_logic;
    en : in std_logic;
    wr : in std_logic;
    addr : in unsigned;
    wrData : in std_logic_vector;
    rdData : out std_logic_vector
  );
end component;

--True dual port (2 readWrite port)
component Ram_2wrs is
  generic(
    wordCount : integer;
    wordWidth : integer;
    clockCrossing : boolean;
    technology : string;
    portA_readUnderWrite : string;
    portA_addressWidth : integer;
    portA_dataWidth : integer;
    portA_maskWidth : integer;
    portA_maskEnable : boolean;
    portB_readUnderWrite : string;
    portB_addressWidth : integer;
    portB_dataWidth : integer;
    portB_maskWidth : integer;
    portB_maskEnable : boolean
  );
  port(
    portA_clk : in std_logic;
    portA_en : in std_logic;
    portA_wr : in std_logic;
    portA_mask : in std_logic_vector;
    portA_addr : in unsigned;
    portA_wrData : in std_logic_vector;
    portA_rdData : out std_logic_vector;
    portB_clk : in std_logic;
    portB_en : in std_logic;
    portB_wr : in std_logic;
    portB_mask : in std_logic_vector;
    portB_addr : in unsigned;
    portB_wrData : in std_logic_vector;
    portB_rdData : out std_logic_vector
  );
end component;
正如你所看到的,黑盒有一个技术参数。要设置它,您可以在相应的内存上使用 setTechnology 函数。目前有4种可能的技术:
autoramBlockdistributedLutregisterFile
如果已为您的设备供应商配置了 SpinalConfig#setDevice(Device) ,则黑盒化可以插入 HDL 属性。
生成的 HDL 属性可能如下所示:
(* ram_style = "distributed" *)
(* ramsyle = "no_rw_check" *)
Comments NOTHING